


Birthday crafting Card making How to Papercraft Papercrafter Techniques Card Making
Craft a trio of alternative card shapes in one tutorial with Tracey Daykin-Jones!
YOU WILL NEED:
PaperCrafter essentials
Die, heart

Diamond card
1. Take portrait green card, 9cm x 27cm, and mark a vertical line down the centre and two additional vertical ones at 3cm and 6cm both sides of the central line.
2. Score a diagonal line from the bottom-left of the first vertical line to the top-centre. Score a second from the bottom-centre to top-left. Repeat on the opposite
side of the central line. Fold into position and add patterned paper to each outer panel.
3. Die cut 12 hearts from patterned paper and fold in half. Adhere the first to a circle of card and overlap the remaining to create a flower shape. Slip the final folded heart underneath the first. Add a yellow button brad to the centre and secure to the card.
.jpg)
Star easel
1. Take a landscape sheet of pink card, 15cm x 21cm, and mark the top-centre with a pencil. Trim from this point to the bottom-left corner and top-centre to bottom-right. Keep any additional pieces.
2. Score a line vertically down the centre and fold. Cover each triangular panel and any additional pieces with floral patterned paper. Secure the triangles one on top of the other, creating a small ‘w’ shape at the bottom.
3. Trim 1.5cm slits on each side of the original folded section and slot the layered triangles into them. To finish, add toppers using 3-D foam pads.
.jpg)
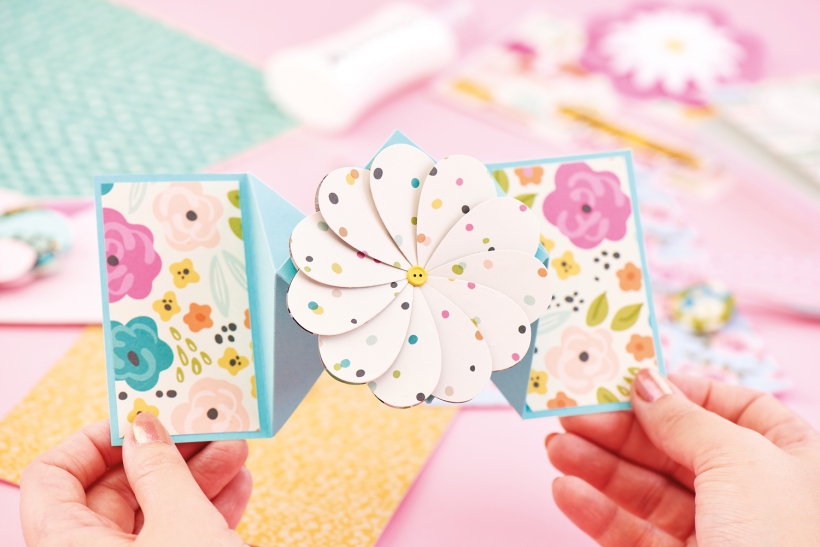
Twisted easel
1. Trim pink card, 14cm x 28cm. In a landscape position, score a vertical line down the centre and a diagonal one from the bottom centre to the top-left to create a twisted easel blank.
2. Cover the square base with dot paper, then add dark pink card to the triangle section at the top. Die cut 12 hearts from teal, pink and patterned papers, then fold in half. Adhere the first to a circle of card and overlap the remaining hearts to create a flower shape.
3. Slip the final heart underneath the first to finish the flower. Add a pink button brad to the centre. Secure to the top section and add toppers to the bottom using foam pads to allow the card to stand.

Busy lives often involve a lot of memos and reminders, and it can sometimes be hard to keep track. Luckily, we’ve got a sophisticated solution to keep your desk tidy and…

If you’re having a quiet Valentine’s with your beloved at home this year, make the place look a little more special with a speedy-to-make hearts frieze. Papercrafting doesn’t get much easier than…
Home decor Home decorations How to Papercraft Papercrafter Techniques Projects

1. Using a 3.5cm circle die, cut eight discs from chipboard and sixteen circles from patterned paper. Glue the patterned circles to either side of the discs and punch a…

Craft essentials
1. Cut a 5cm x 15cm strip of double-sided patterned paper and fold in half lengthways. Draw parallel pencil lines at 1.5cm and 2cm from the…


