

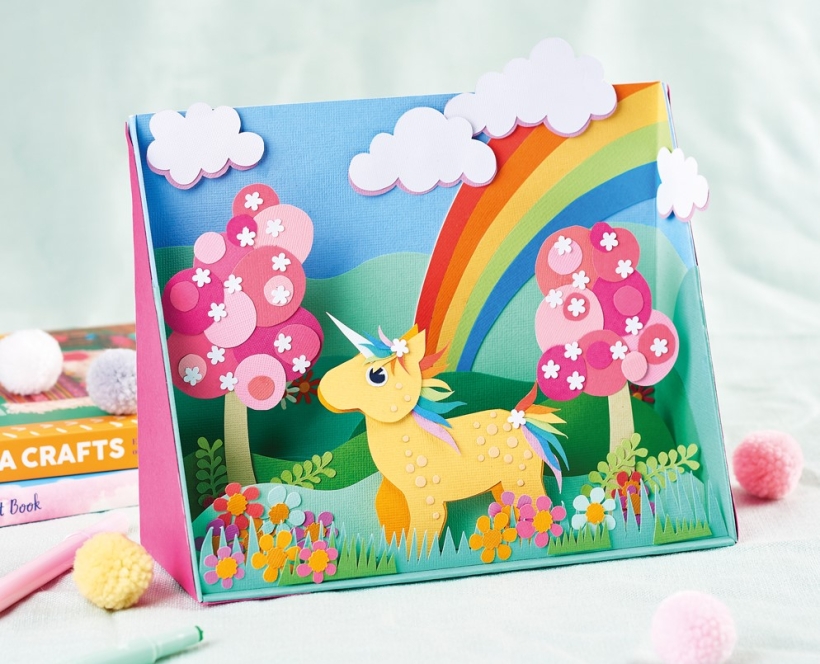


Set the scene for playtime with this colourful 3D unicorn diorama. Using basic craft materials and your free templates or SVG files, Corinne guides you every step of the way from building the box to adding those final finishing touches. If you want to simplify the project and speed things up, use an empty shoebox and just focus on the decoration. We’ve opted for a unicorn theme (obviously) but feel free to tailor the design, scene and colours to suit your taste.
You will need:
Templates or SVG files
Dies, small flowers
Stiff card
Cardstock, various colours
Punch, hole
Adhesives: glue, 3D foam pads
Die-cutting machine
1. For the back and base, trim two rectangles from stiff card, one 8cm x 23cm and the other 18cm x 23cm. Cut out another rectangle, 8cm x 18cm, and snip in half from corner to corner to form the sides. Cover the back and side panels with blue card, leaving a 2cm excess border all around. Fold the border to the back and secure.
2. Lay the two triangles on either side of the back panel with a 1mm gap between each piece and tape together on the reverse. Cover the base with green card as before and tape to the bottom of the back panel. Keep the card pieces flat as you add details.
3. Cut wavy panels from several shades of green to create hills. Glue the lighter hills to the back panel and use 3D foam pads to add lower, darker hills in the foreground. Add hills to the side panels, matching up the edges. Download the templates from our website and cut the rainbow curves from various colours. Glue to the right-hand side, tucking the ends of the rainbow behind a hill and trimming the top in line with the box.
4. Snip the cloud shapes from white and lilac card. Layer the white pieces onto the lilac clouds to create a shadow effect. Fix to the sky with 3D foam pads. Cut three wavy strips from various shades of green. Score and fold under 1cm along the bottom edge of each to create tabs. Glue the tabs to the base panel of the diorama, leaving a 1cm gap between each hill.
5. Trim different sized circles from a variety of pink cardstock. Layer onto curved tree trunk shapes and add small die-cut flowers to the circles. Glue the trunks of the trees behind the hills in the foreground. Cut a grassy strip of green card and fix to the front of the scene with a fold along the bottom as before. Add smaller sections of grass to the front with 3D foam pads.
6. Decorate the hills with small die-cut flowers. Fold the base and sides of the diorama in and tape together on the reverse so your scene can stand up. Cover the outside of the box with pink card. Using the templates, trim the unicorn’s body and head shapes from yellow and orange card. Layer the pieces together with 3D foam pads and add dappling using small circles of cream card cut with a hole punch.
7. Create an eye and horn, then glue to the head of the unicorn. Trim small curves from rainbow colours. Layer together to make themane and tail, tucking the ends of the mane between the body layers. Cover the base of the tail and forelock with small white flowers. Glue a narrow, folded strip of card to the back of the unicorn behind a leg so it can stand up.

Busy lives often involve a lot of memos and reminders, and it can sometimes be hard to keep track. Luckily, we’ve got a sophisticated solution to keep your desk tidy and…

If you’re having a quiet Valentine’s with your beloved at home this year, make the place look a little more special with a speedy-to-make hearts frieze. Papercrafting doesn’t get much easier than…
Home decor Home decorations How to Papercraft Papercrafter Techniques Projects

1. Using a 3.5cm circle die, cut eight discs from chipboard and sixteen circles from patterned paper. Glue the patterned circles to either side of the discs and punch a…

Craft essentials
1. Cut a 5cm x 15cm strip of double-sided patterned paper and fold in half lengthways. Draw parallel pencil lines at 1.5cm and 2cm from the…


