


Card making How to Techniques Card Making
Did you know that you can combine cardmaking with stitching? Well, now you do!
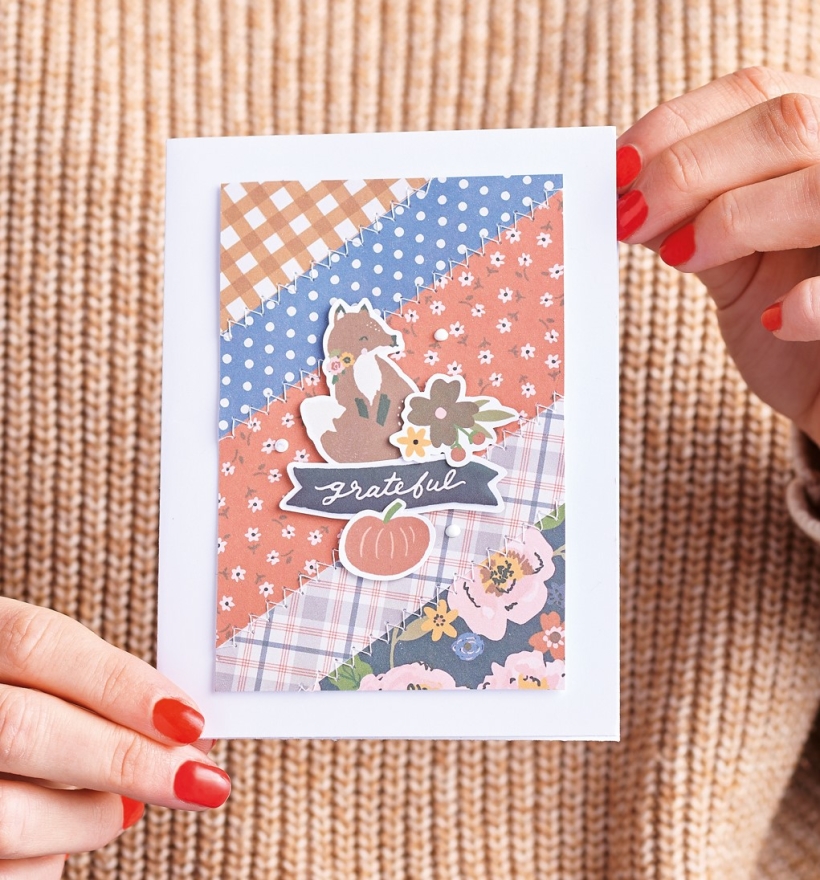
Boasting contrasting patterned papers and neat zig-zag stitches, we love the patchwork-esque design you end up with on these autumnal cards designed by the wonderful Francesca Vignoli. It’s good news for all the multi-skilled crafters out there, but don’t fear if you’ve never used a sewing machine before as we share our faux stitching secrets with you below – shh, no one will know!
Mix and match your papers
To achieve the patchwork effect, Francesca has combined contrasting patterned papers but has mixed up the shapes and angles to create four different looks. Cut the papers into strips, squares, triangles or irregular shapes, then adhere them at different angles. We have worked out the measurements for you so the individual shapes will form the perfect rectangular panel once assembled. It’s a great way to use up your paper scraps, that’s for sure!
Back to sewing school
Before you get started, you need to get your sewing machine prepped by selecting a needle that’s already a little worn out… yes, really. It might sound crazy, but stitching paper can blunt your needle and it would be a shame to ruin a brand new one. You’ll then need to select the stitch type and length on your machine. The further apart your stitches, the less likely your paper will tear.
No sewing machine? No problem!
If stitching isn’t your thing, delve into your pen stash and have fun with a white or black fineliner instead. Simply draw little faux stitches here and there to recreate the look. We recommend using a ruler to ensure your dashes are straight and precise. A running stitch might be easier when using a pen, but feel free to have a go at more decorative stitches if you fancy a challenge.
You Will Need:
Simple Stories Cozy Day Digital Collection Kit Bundle
Simple Stories Cozy Day Digital Embellishment Bundle
Nuvo Crystal Drops, Simply White
Cardstock, white
Paper, white
Thread, white
Adhesives: 3D foam pads, glue, washi tape
Printer
Sewing machine
Stitched Fox Card
1. Create a white 10.5cm x 14cm side-folding blank and trim white paper to 8cm x 12cm. Cut out three 4cm wide strips and two 2cm wide stripes from patterned papers. Glue them at a diagonal onto the panel of paper.
2. Trim the excess paper to size. Use a sewing machine and white thread, sew a zig-zag stitch where the different patterns meet. Snip any excess thread and secure the ends on the back with washi tape.
3. Attach the panel onto the front of the blank with 3D foam pads. Add toppers and a sentiment on top with 3D foam pads and complete with white Nuvo Crystal Drops.
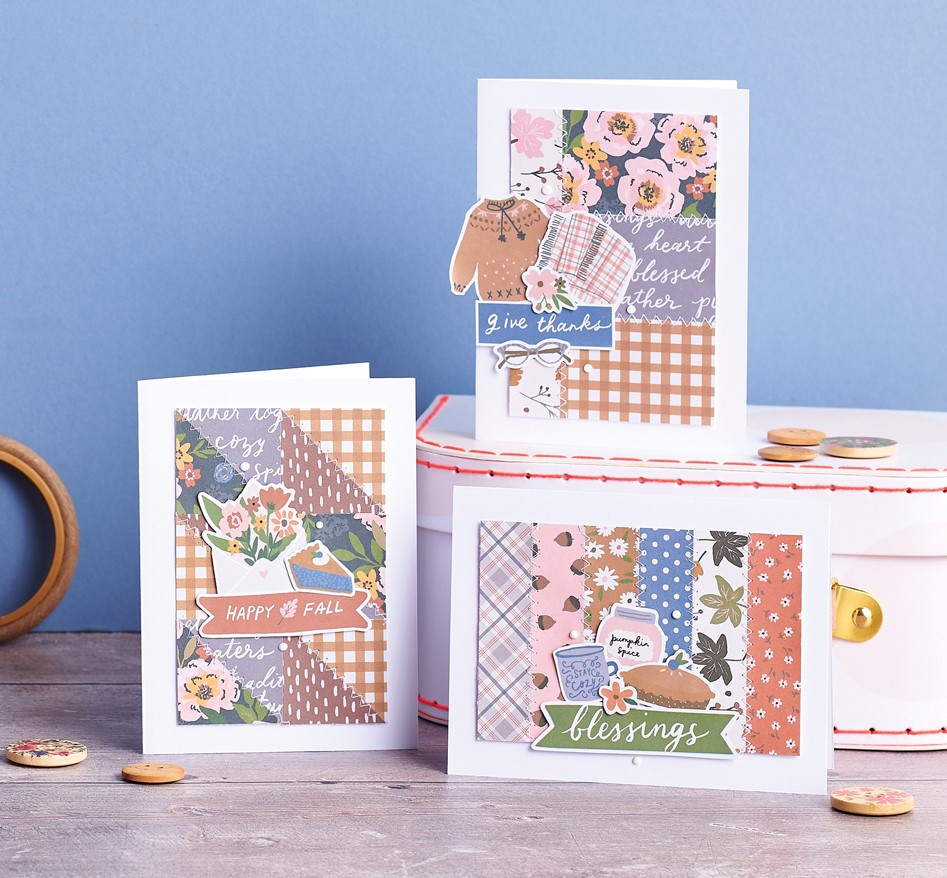
Stitched Strips Card
1. Create a 10.5cm x 14cm top-folding landscape blank from white card. Cut six 2cm x 8cm stripes from patterned papers. Arrange and glue the strips onto a panel of white paper, 8cm x 12cm, and leave to dry.
2. Using a sewing machine and white thread, sew along where the stripes meet. Trim all the lengths of excess thread and secure to the back of the panel with washi tape.
3. Mount the panel onto the blank with 3D foam pads. Add a cluster of toppers and a sentiment to the card front using 3D foam pads. Finish with white Nuvo Crystal Drops.
Stitched Cosy Card
1. Create a 10.5cm x 14cm side-folding blank from white card. Cut white paper to 8cm x 12cm. Snip a 2cm x 12cm strip and three 4cm x 6cm panels from patterned papers.
2. Arrange and glue the patterned papers onto the white paper. Using a sewing machine and white thread, sew along the first long strip, then where the other papers meet.
3. Trim away the loose sewing threads and mount onto the blank with 3D foam pads. Add toppers and a sentiment with 3D foam pads, then finish with white Nuvo Crystal Drops.
Autumnal Patchwork Card
1. Make a white side-folding blank, 10.5cm x 14cm, then cut six 4cm squares from patterned papers. Snip each square in half to create 12 triangles.
2. Cut white paper to 8cm x 12cm. Mix up the triangles and glue onto the paper to form six squares. On your sewing machine, sew a zig-zag stitch along each diagonal line.
3. Trim the loose threads and secure the ends on the back with washi tape. Add toppers and a sentiment on top with 3D foam pads and embellish with white Nuvo Crystal Drops.
TOP TIPS
- Cluster your toppers together with 3D foam pads to ensure they stand out
- Leave a white border around your patchwork panels for subtle yet striking results
- Opt for Tonic Studios’ Nuovo Crystal Drops in white for a barely-there embellishment

Busy lives often involve a lot of memos and reminders, and it can sometimes be hard to keep track. Luckily, we’ve got a sophisticated solution to keep your desk tidy and…

If you’re having a quiet Valentine’s with your beloved at home this year, make the place look a little more special with a speedy-to-make hearts frieze. Papercrafting doesn’t get much easier than…
Home decor Home decorations How to Papercraft Papercrafter Techniques Projects

1. Using a 3.5cm circle die, cut eight discs from chipboard and sixteen circles from patterned paper. Glue the patterned circles to either side of the discs and punch a…

Craft essentials
1. Cut a 5cm x 15cm strip of double-sided patterned paper and fold in half lengthways. Draw parallel pencil lines at 1.5cm and 2cm from the…


