


Card making How to Papercraft Papercrafter Techniques Projects
Celebrate summer in style with these quirky shaped summer cards. Featuring beach-ready wave and flip-flop designs plus a delicious-looking ice cream card, these shaped summer cards can be started right away thanks to our FREE templates
You will need:
Templates
Dies, Sizzix Thinlits Vacation Words: Block by Tim Holtz
Stamps: Altenew Fresh Bloom, Avery Elle Simple Sentiments
Ink pads: Ranger Distress Oxide Salvaged Patina, Kitsch Flamingo; VersaFine Onyx Black
Cardstock: white, gold mirri
Lawn Fawn Watercolor Wishes 6” x 6” paper pad
Embellishments: sequin stars, sequin trim, white ribbon
Nuvo Crystal Clear Glaze
Kuretake ZIG Clean Color Real Brush Pens: Bright Yellow, Pink, Cobalt Blue, Mustard, Dark Brown
Punch, hole
Tools: ink blending, sand eraser
Adhesives: 3D foam pads, double-side tape, glue
Die-cutting machine

1. Print the ice cream template and cut out. Cut apart the separate cone and ice cream sections. Alternatively, leave the template intact if you want to cut all of the ice cream from the same paper. Scribble with a pencil on the reverse of each motif, then place onto patterned paper and trace over the lines and around the templates. This will transfer the templates onto patterned paper. Go over the lines and add shading with complementary brush pens. Adhere the individual pieces onto white card. Snip two flakes from brown patterned paper, add shading, then attach.
2. Score and fold just above the top of the ice cream, then snip around the shape, leaving a narrow border. Stamp a sentiment onto white card in black ink. Trim and secure to the greeting, then embellish with sequins and stars.

1. Print out the flip-flop template and trim. Scribble with a pencil on the reverse of the motif, place onto pink patterned paper and trace over the lines and around the template to transfer the template. Cut out the shape, then stamp flowers on top in pink ink. Apply the same ink around the edges with a blending tool.
2. Punch holes at the sides and one at the top, using the template as a guide. Thread two lengths of white ribbon through the top hole and the other ends through the sides. Secure on the reverse. Use thin double-sided tape to layer up the ribbon towards the top, then embellish with a sequin trim.
3. Stamp a sentiment in black, trim and adhere to the right-hand edge. Die cut a larger sentiment from gold mirri card, then secure below. Score and fold white card, 21cm x 30cm, in half and trace the flip flop pattern template onto it, with the top edge overlapping to keep a section of the fold intact. Cut out to form a blank and adhere the decorated panel on top.
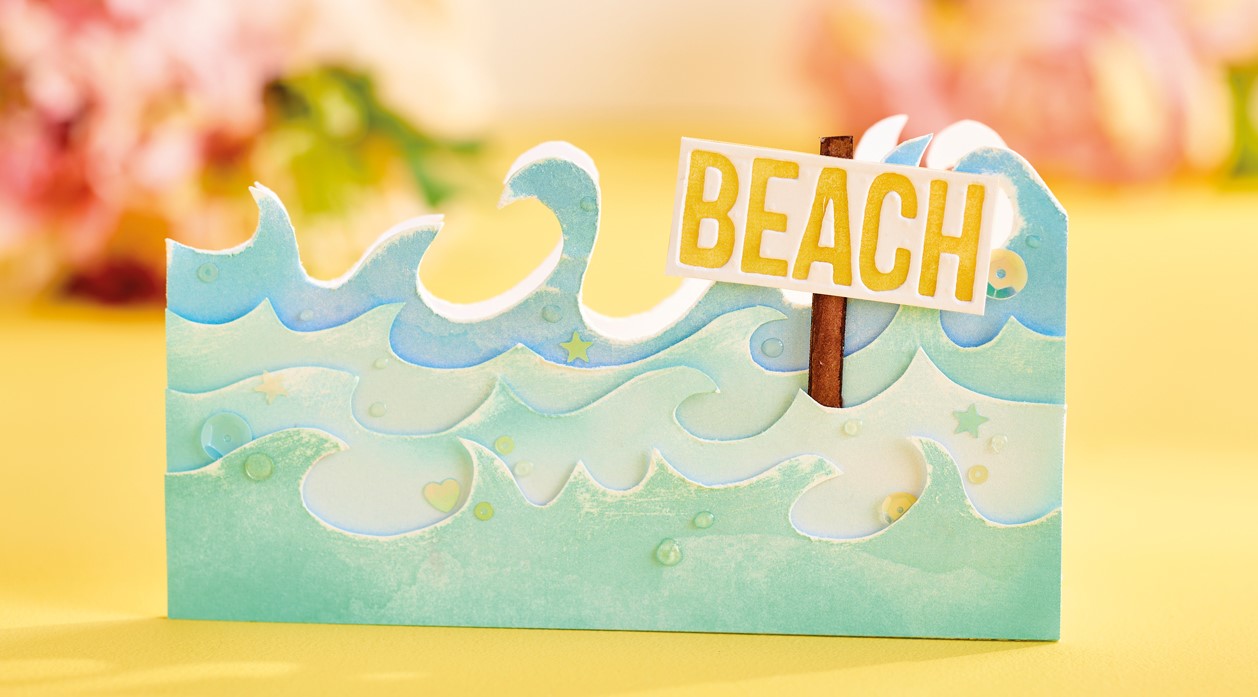
1. Print the wave templates and cut out. Scribble with a pencil on the reverse of each motif, then place onto blue patterned paper and trace around the template. This will transfer the templates onto the patterned paper. Cut out each piece. Place the largest piece onto a white blank, then trace around it and cut out to create a shaped blank. Layer the patterned paper shapes on top using 3D foam pads.
2. Sand down the edges with a sand eraser to create a distressed look. Die cut ‘Beach’ from white and layer the negative die-cut onto yellow card. Cut out a strip from brown for a sign pole. Assemble the sign and fix to the card. Embellish with sequins and Nuvo Crystal Clear Glaze to finish.

Busy lives often involve a lot of memos and reminders, and it can sometimes be hard to keep track. Luckily, we’ve got a sophisticated solution to keep your desk tidy and…

If you’re having a quiet Valentine’s with your beloved at home this year, make the place look a little more special with a speedy-to-make hearts frieze. Papercrafting doesn’t get much easier than…
Home decor Home decorations How to Papercraft Papercrafter Techniques Projects

1. Using a 3.5cm circle die, cut eight discs from chipboard and sixteen circles from patterned paper. Glue the patterned circles to either side of the discs and punch a…

Craft essentials
1. Cut a 5cm x 15cm strip of double-sided patterned paper and fold in half lengthways. Draw parallel pencil lines at 1.5cm and 2cm from the…


