


Card making How to Papercraft Papercrafter Quilling Techniques Card Making
Create striking sentiments amongst a flourish of quilled blooms with Elizabeth Moad
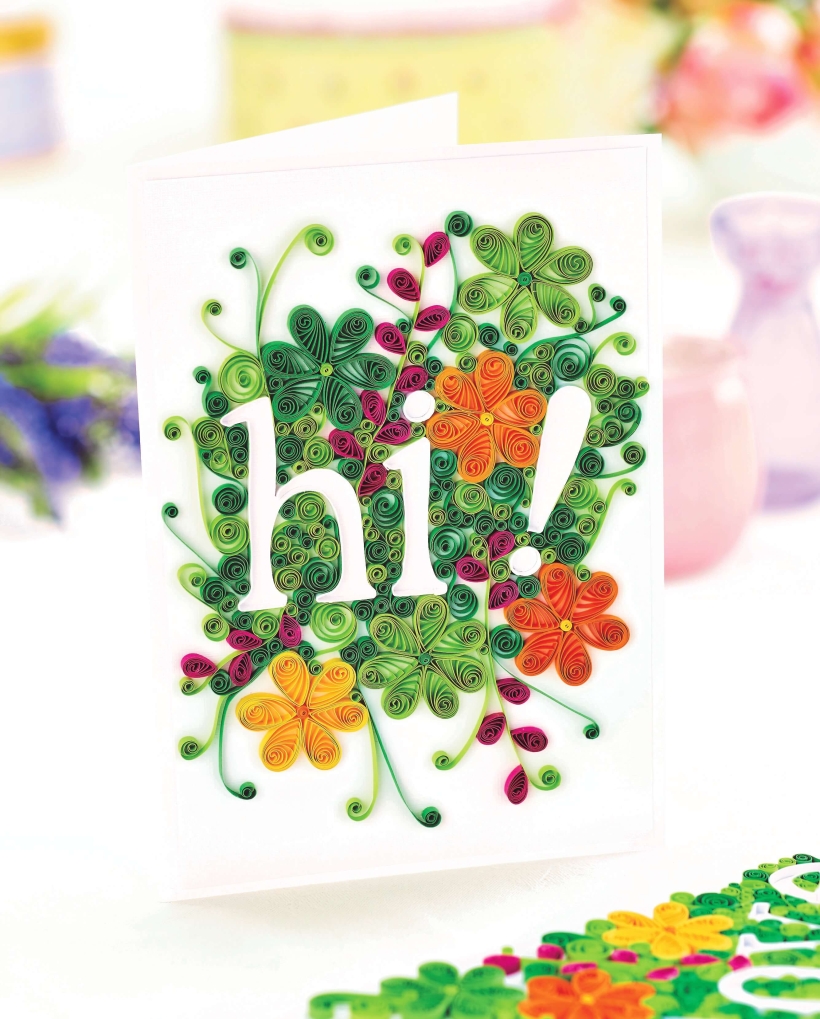
Put your pen down and pick up your quilling tool to personalise or add sentiments to your projects. As an alternative to calligraphy or stamping, quilled lettering is a great way to add instant impact to your designs – we love the look of messages hidden within a flourish of quilled flowers. Lettering with a twist, be sure to achieve unique designs to wow your recipient!
YOU WILL NEED:
Quilling paper, 3mm: white, pink, red, yellow, orange, green
Quilling tools: slotted, needle
Tweezers
Adhesives: glue, masking tape
METHOD:
1. Print out a ‘Hi’ sentiment and attach it to an 11.5cm x 17cm panel of white card. Print out a sentiment and use masking tape
to temporarily attach it to your card blank. Use an embossing tool to trace the outline of each letter, pressing heavily.
2. Use a little glue to stick white strips to the embossed outline of the letters. Work slowly and hold each piece in place with tweezers as the adhesive dries.
3. To create a flower petal, make a loose closed coil from a 20cm length of paper, pinch into a teardrop shape. Cut a strip to 5cm and make a tight coil for the centre. Trim several green strips between 5cm and 8cm in length and loosely coil each end, then stick a few near every flower.
4. Coil and pinch 10cm strips in a different colour into teardrop shapes. Attach at 1cm intervals along each side of the green strips. Using a needle tool, make open coils from lengths of dark and light green paper between 2cm and 10cm, then glue to the greeting.
5. Make six flowers in various colours and arrange them around the sentiment. Mount the completed panel onto a 12.5cm x 18.5cm white blank.

Busy lives often involve a lot of memos and reminders, and it can sometimes be hard to keep track. Luckily, we’ve got a sophisticated solution to keep your desk tidy and…

If you’re having a quiet Valentine’s with your beloved at home this year, make the place look a little more special with a speedy-to-make hearts frieze. Papercrafting doesn’t get much easier than…
Home decor Home decorations How to Papercraft Papercrafter Techniques Projects

1. Using a 3.5cm circle die, cut eight discs from chipboard and sixteen circles from patterned paper. Glue the patterned circles to either side of the discs and punch a…

Craft essentials
1. Cut a 5cm x 15cm strip of double-sided patterned paper and fold in half lengthways. Draw parallel pencil lines at 1.5cm and 2cm from the…


