


Card making Die cutting How to Papercraft Papercrafter Stamping Techniques Card Making
Prepare to pour your heart out with Ingrid Vichova’s dreamy mixed media technique… it’s easier than it looks!
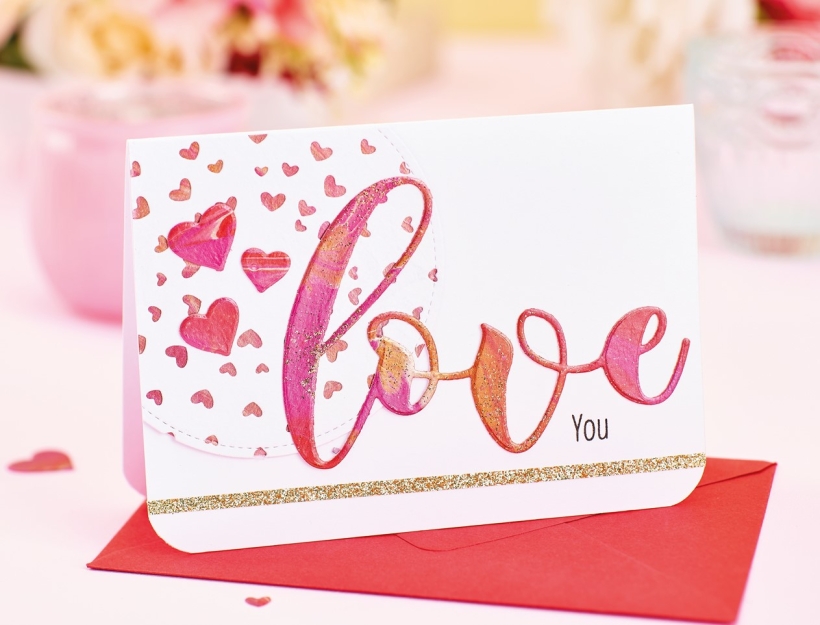
YOU WILL NEED:
Paint, Color Pour Magic Fiery Opal
Dies: Altenew Love Letters, Lawn Fawn Outside In Stitched Rectangle, Concord & 9th Hugs & Kisses Turnabout
Stamps, Concord & 9th Little Love Tags
Ink pad, Ranger Wendy Vecchi Archival Jet Black
Punch, corner rounder
Embellishments: glitter, foil flakes
Small plastic cups
Lollipop sticks
Die-cutting machine
Adhesive, glue
METHOD:
1. For the paint poured background, pour a little bit of each paint into a small plastic cup, alternating colours of the paint as you go. Alternate the colours a few times, then place the cardstock on top and flip it upside down. Slowly move the cup across the cardstock, slightly lifting it as you pull. This will help to spread the paint and create an interesting pattern.
2. Tilt the cardstock back and forth until the paint is completely spread all over. Have a spare card ready to catch any dripping paint. You can add a few specs of flakes, glitter or chunky glitter on top whilst the paint is still wet, then allow it to dry completely.
3. Once dry, select your favourite areas of the background and die cut the ‘Love’, a few small hearts and a large stitched circle. Set these aside. Use the turnabout die to create the mini hearts background, then use a stitched circle die to cut it out.
4. Back it with the paint poured circle and secure to the top-left corner of a 10.5cm x 15cm white landscape blank. Trim the excess and adhere the heart die-cuts on top. Fix the die-cut sentiment, then add a second stamped sentiment below in black. Round off the bottom corners of the greeting with a punch to finish.

Busy lives often involve a lot of memos and reminders, and it can sometimes be hard to keep track. Luckily, we’ve got a sophisticated solution to keep your desk tidy and…

If you’re having a quiet Valentine’s with your beloved at home this year, make the place look a little more special with a speedy-to-make hearts frieze. Papercrafting doesn’t get much easier than…
Home decor Home decorations How to Papercraft Papercrafter Techniques Projects

1. Using a 3.5cm circle die, cut eight discs from chipboard and sixteen circles from patterned paper. Glue the patterned circles to either side of the discs and punch a…

Craft essentials
1. Cut a 5cm x 15cm strip of double-sided patterned paper and fold in half lengthways. Draw parallel pencil lines at 1.5cm and 2cm from the…


