


Birthday crafting Card making How to Origami Papercraft Papercrafter Techniques Projects
Whether you’re an origami expert or yet to really get your fold on, this old-time dutch technique is one that crafters of any level will be able to have fun with. It’s an stunning technique that is immensely fun to make, and also, immensely beautiful to look at.
,
YOU WILL NEED
Papers, Japanese origami
Card: cream, blue, pink
Dies: circles, alphabet, nesting squares
Embellishments: brads, ribbon
Die-cutting machine
3D foam pads
METHOD:
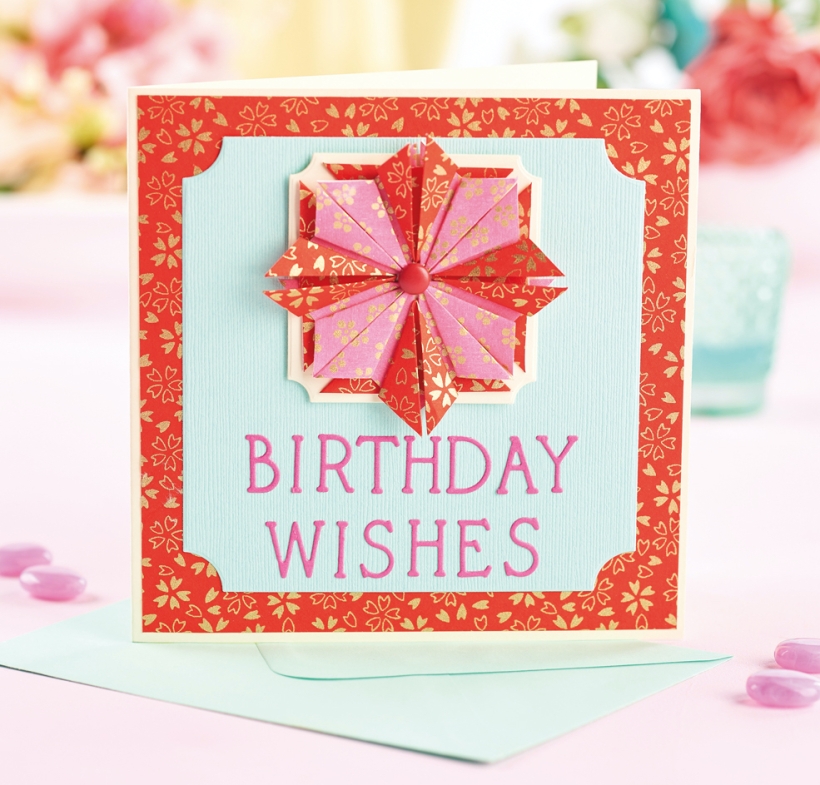
1 Mount red origami paper onto a cream blank, 12.5cm square. Die cut a large decorative square from light blue card and letters to spell out ‘Birthday wishes’ from pink card. Fix the letters onto the bottom of the blue panel.
2 Cut four 4cm squares from pink origami paper, and four 5cm squares from red. Fold each square in half, keeping the pattern on the inside. Open the square out and fold in half corner to corner, keeping the pattern outermost. Repeat the process with alternating corners until each square has three crease lines.
3 Push the valley folds in and flatten to form a triangle. Fold an outer corner upwards, then tuck in. Do the same with the opposite corner until you have a triangle and a kite shape. Repeat the process for each piece.
4 Assemble the folded shapes into a rosette, alternating the colours and ensuring the kite shapes form the top layer. Fix a red brad to the centre and layer onto cream card with inverted corners. Mount towards the top of the blue panel, then secure to the greeting to finish.
•
•

Busy lives often involve a lot of memos and reminders, and it can sometimes be hard to keep track. Luckily, we’ve got a sophisticated solution to keep your desk tidy and…

If you’re having a quiet Valentine’s with your beloved at home this year, make the place look a little more special with a speedy-to-make hearts frieze. Papercrafting doesn’t get much easier than…
Home decor Home decorations How to Papercraft Papercrafter Techniques Projects

1. Using a 3.5cm circle die, cut eight discs from chipboard and sixteen circles from patterned paper. Glue the patterned circles to either side of the discs and punch a…

Craft essentials
1. Cut a 5cm x 15cm strip of double-sided patterned paper and fold in half lengthways. Draw parallel pencil lines at 1.5cm and 2cm from the…


