


Card making Papercrafter Techniques Card Making
The up-coming spring-themed PaperCrafter magazine and kit has everything you need to create seasonal greetings, Easter cards and decorations, as well as a whole host of lovely looking gifts and keepsakes.
PaperCrafter 70 kit, Ink pads, white and dark pink, Letraset pro maker, cool aqua, PVA glue and brush, Double-sided tape, Foam pads, Fine scissors or craft knife
Here’s a sneaky preview of what’s on offer with this super simple bonus card making project that really makes the most of the pack’s pretty veneer shapes as well as adorable card designs and motifs. Whip this up and more with the next issue of PaperCrafter out on 28th March 2014.
If you’d like to get PaperCrafter delivered straight to your door, why not subscribe?
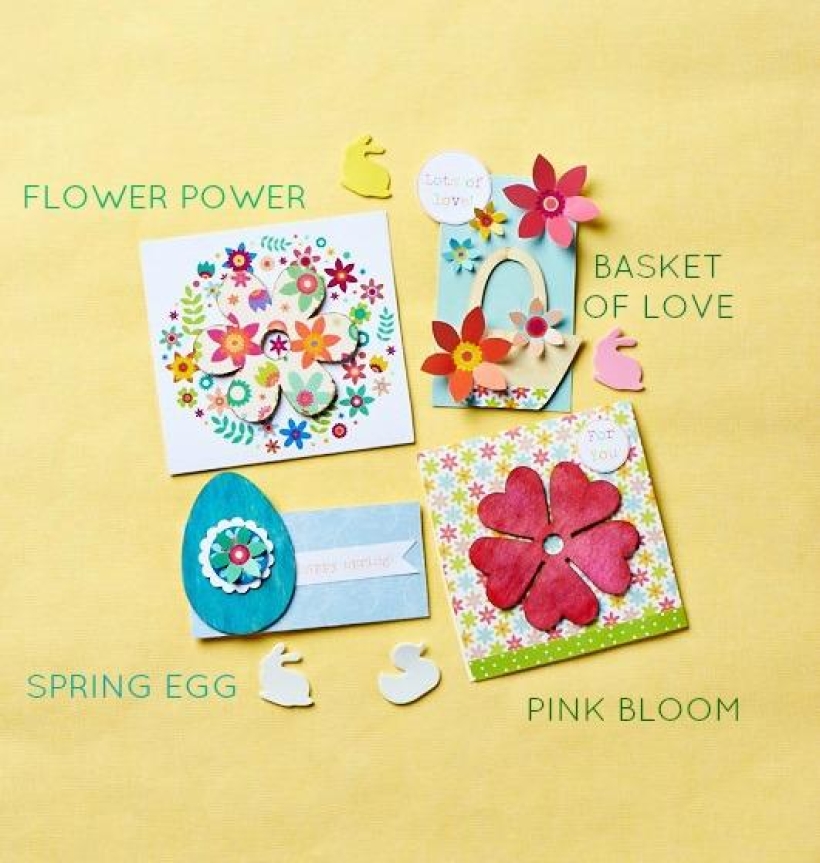
• Dab a white ink pad all over the daisy veneer shape and leave to dry. Once dry, brush the white side over with PVA glue.
• Cut out a 10.5 cm square panel of the kit's floral decoupage tissue paper and cover the flower with it. Use fine scissors or a craft knife to cut out the centre and around the petals. Use the brush to gently remove any creases or bubbles.
• Trim the floral garland card to a 11cm square and adhere the daisy to the central circle using double-stacked foam pads.Finish by fussy cutting a small floral motif and place in the flower centre as shown.
• Cut out a floral strip and attach to the bottom of the basket shape, snip around it so it fits to the bottom as shown.
• With the fold at the top, cut down the mint blank to 7cm x 11.5cm and affix the basket to the base. Place the round 'Lots of love' sentiment to the top left corner of the card.
• Carefully fussy cut around the pop-out large orange and pink, medium peach and small blue and yellow flower shapes, leaving little nicks where the petals meet the centre. Bend the petals forward and attach the centre of each flower to the card and basket as shown.
• Take the floral and peach blank and slice off the bottom section. Cover the front of the peach part of the blank with a 5.7 x 11.5 panel of blue and white patterned card.
• Colour the egg shape with a blue or aqua marker. Using foam pads, layer on a 3.5cm scalloped circle, the 2.5 circular motif and a fussy-cut mint flower. Attach the whole arrangement to the left of the card as shown, again using foam pads.
• Cut out the 'Happy spring' sentiment into a flag shape and fix to the card with double-sided tape, ensuring the left edge is tucked behind the egg.
• Colour the front of the heart-shaped petal flower with the dark pink ink pad and leave to dry.
• Take the floral piece of the blank you have worked with above and, with the fold at the top, attach a 1cm x 12cm green spotty strip at the bottom tucking the edges at the back of the card front.
• Affix the floral shape to the front on the card with double-sided tape. Use foam pads to secure the 'For you' sentiment to the top right of the card.

Busy lives often involve a lot of memos and reminders, and it can sometimes be hard to keep track. Luckily, we’ve got a sophisticated solution to keep your desk tidy and…

If you’re having a quiet Valentine’s with your beloved at home this year, make the place look a little more special with a speedy-to-make hearts frieze. Papercrafting doesn’t get much easier than…
Home decor Home decorations How to Papercraft Papercrafter Techniques Projects

1. Using a 3.5cm circle die, cut eight discs from chipboard and sixteen circles from patterned paper. Glue the patterned circles to either side of the discs and punch a…

Craft essentials
1. Cut a 5cm x 15cm strip of double-sided patterned paper and fold in half lengthways. Draw parallel pencil lines at 1.5cm and 2cm from the…


