


How to Papercraft Papercrafter Party makes Techniques Projects
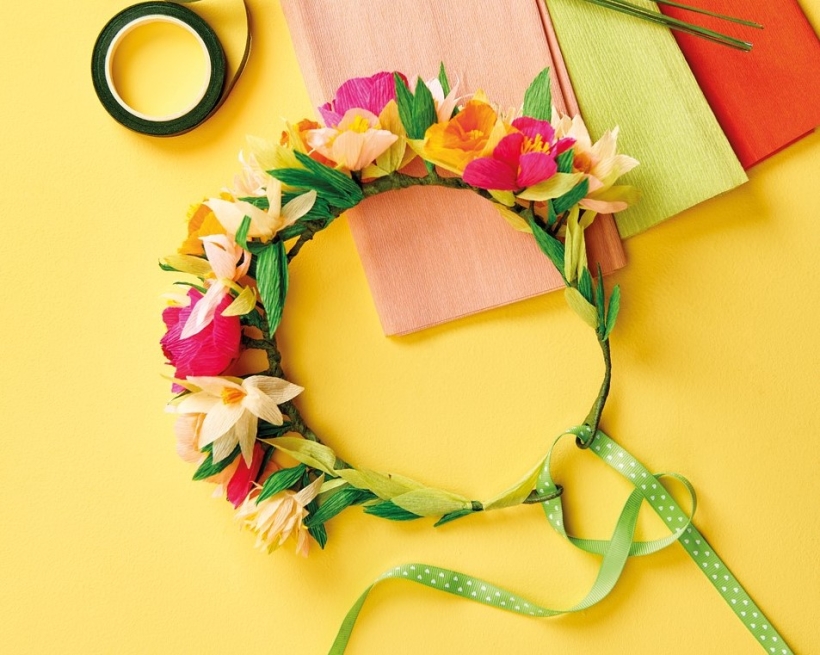
With Mother’s Day coming up, we couldn’t think of a better way to celebrate mum than with a spring crepe paper floral crown, fit for a queen. Elsewhere in the year, we could see this flower crown making an appearance at birthday parties, baby showers and weddings… give us any excuse to wear this head-turning accessory! Boasting florals and foliage fashioned from crepe paper in warm, new-season hues, Corinne Bradd shows you how to make her stunning flower crown below.
You will need:
Templates from papercraftermagazine.co.uk
Crepe paper, various colours
Polystyrene balls, 25mm
Soft wire, 2-3mm
Florist’s wire
Ribbon, green
Cotton thread
Pliers
Adhesives: PVA glue, florist’s tape
STAMENS
1. Cut yellow crepe, 6cm along the grain and 3cm wide. Fold in half to make a square, and clip into the edges to a depth of 2cm. Unfold and roll the individual pieces of fringe between your fingers before refolding.
2. Cut florist’s wire to 6cm long and bend over 5mm at one end with pliers. Apply glue to the folded edge of the fringe and wind the crepe paper around the wire, just below the bent end. Secure with a wrap of cotton thread tied tightly.
PETALS
1. Choose two or three shades of similar coloured crepe paper and, using our templates, cut several of your choice of petal from each, ensuring they are cut in line with the grain. Gently ease out the creases of the grain at the edges of each petal to shape them.
2. Apply glue to the base edge of a petal and wrap around the stamen’s wire. Allow the glue to dry for a few seconds before adding another in the same way on the opposite side of the first wrap. Continue adding petals in this way to build up the flower.
3. Tear a length of florist’s tape and while gathering the petals in one hand, wrap the tape around the base of them several times. Continue to wind the rest of the tape down the length of the wire.
LEAVES
Cut several leaf shapes along the grain of green crepe paper and gently ease out the creases in the middle of each leaf. Place the base of a leaf against the stem of a flower and secure by wrapping florist’s tape around the base only.
PEONY FLOWER
1. Snip florist’s wire to 12cm and fold in half. Push the ends of the bent wire through the centre of a small polystyrene ball and twist together at the bottom.
2. Cut a 4cm x 7cm rectangle of coloured crepe paper with the grain on the long edge. Stretch the paper to make a square and wrap over the ball, gathering the edges underneath and securing with cotton thread.
3. Trim several wide petals from two or three similar colours of crepe paper and ease out the creases in the middle of each to make a bowl shape. Apply glue to the base of each petal and wrap them over the ball.
4. As the flower builds up, stretch out the top edges of the petals as well as the centres so they fan out more. Secure the base of the flower with florist’s tape.
TO MAKE THE CROWN
1. Bend the soft wire into a horseshoe shape. Start at the centre of the crown and wrap the wire stems of each flower around the thicker wire. Tear a length of florist’s tape and secure the join by wrapping well.
2. Add more flowers and leaves on either side, mixing up the types and colours, and binding with plenty of florist’s wire, especially over the ends of the wire stems.
3. Cover at least half the crown, then fill in the sides with leaves. Wrap the remaining 7cm or 8cm at each side with florist’s tape before bending up the ends to make loops and binding well. Thread green ribbon through the loops at the back of the crown, tighten to fit, then tie into a bow.

Busy lives often involve a lot of memos and reminders, and it can sometimes be hard to keep track. Luckily, we’ve got a sophisticated solution to keep your desk tidy and…

If you’re having a quiet Valentine’s with your beloved at home this year, make the place look a little more special with a speedy-to-make hearts frieze. Papercrafting doesn’t get much easier than…
Home decor Home decorations How to Papercraft Papercrafter Techniques Projects

1. Using a 3.5cm circle die, cut eight discs from chipboard and sixteen circles from patterned paper. Glue the patterned circles to either side of the discs and punch a…

Craft essentials
1. Cut a 5cm x 15cm strip of double-sided patterned paper and fold in half lengthways. Draw parallel pencil lines at 1.5cm and 2cm from the…


