


Home decor How to Papercraft Papercrafter Techniques
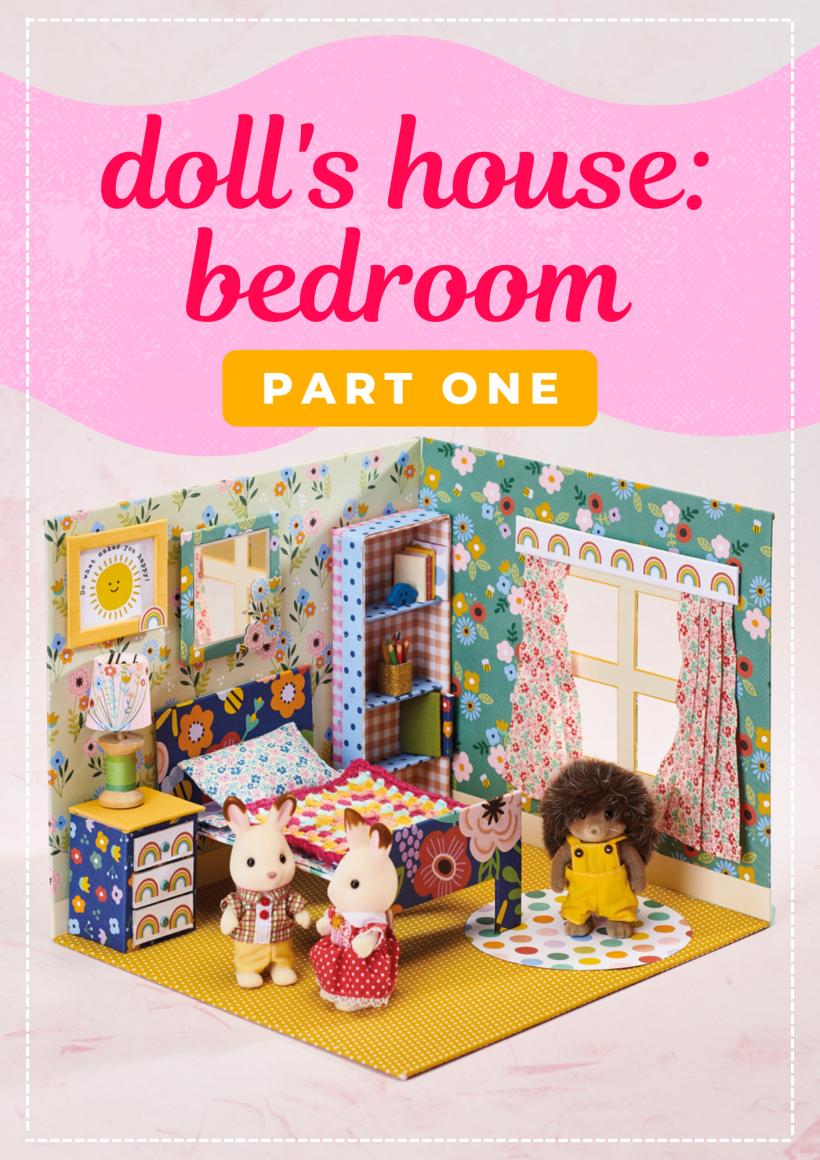
A handmade doll’s house room with accompanying furniture and flourishes? Yes please!
No matter how old you are, there’s something so touching about a doll’s house – whether it evokes memories from your childhood or you simply can’t stand the cuteness of something so miniature. But as well as feeling sentimental, we’re astounded. Our star crafter Corinne Bradd has made this wee bedroom from scratch and she wants you to do the same. Employ basic papercrafting techniques, a little soft crafts (oo-er!) and some choice adhesives. By the end of it, you’ll have created a family heirloom full of fun.
And what a family heirloom it’ll be if it’s a handmade doll’s house – how truly special. Doll’s house furniture is also quite costly, so how amazing to be able to make your own with our easy DIY project? Here we’re sharing part one which includes the room set itself, the bed, chest of drawers and bookcase. Let’s get going…
YOU WILL NEED:
Mountboard
Patterned papers
Cardstock, various colours
Patterned cotton fabric
Stuffing
Yarn
Washi tape
Wooden cotton reel, small
Wooden skewer
Small mirror
Pinking shears
Paper fasteners
Crochet hook, 3mm
Tapestry needle
Adhesives: solid glue stick, tacky PVA glue, 3D foam pads
ROOM SET
1. Take a 41cm x 43cm rectangle of mountboard and cut a 19cm square from one corner. Half-cut through the remaining piece in line with the sides of the square to enable you to fold up two corner sections to make walls and a floor. Do not fix the walls together, instead work on the project while it’s still flat. Cover the floor area with a lightly patterned paper, allowing a 2cm overlap on the open edges. Fold over and glue down on the underside.
2. Decide on the placement for a window in the shorter wall and cut four small squares. Cover the wall sections with strongly patterned paper, folding and glueing the excess to the underside as before. Make a cross in the paper in the centre of each of the window squares, then fold and glue the paper to the reverse. Snip 1.5cm wide strips of cream cardstock and glue along the bottom of each wall to make skirting boards. Cut a window frame from the same cream card, matt onto pale yellow, then glue over the window.
3. Cut two pieces of patterned fabric to 10cm x 14cm. Fold in and glue 5mm on each long side. Fold up 5mm along the bottom edge and glue. Pleat each piece of fabric to reduce the top of each curtain to around 3cm wide and press the pleat firmly before glueing a curtain to each side of the window. Trim mountboard to 1.5cm x 14cm and cover with a band of decorative paper, folding the excess to the back. Fix above the window with 3D foam pads to cover the tops of the curtains and create a pelmet. Cut a circle of patterned paper to represent a rug.
4. Reinforce the half-cut fold lines on the back of the room by folding the walls in and fixing tape over the fold lines. Cover the back of the work with coloured cardstock if desired, remembering to cut out holes for the window. Secure the walls in an upright position with several short lengths of washi tape fixed horizontally.
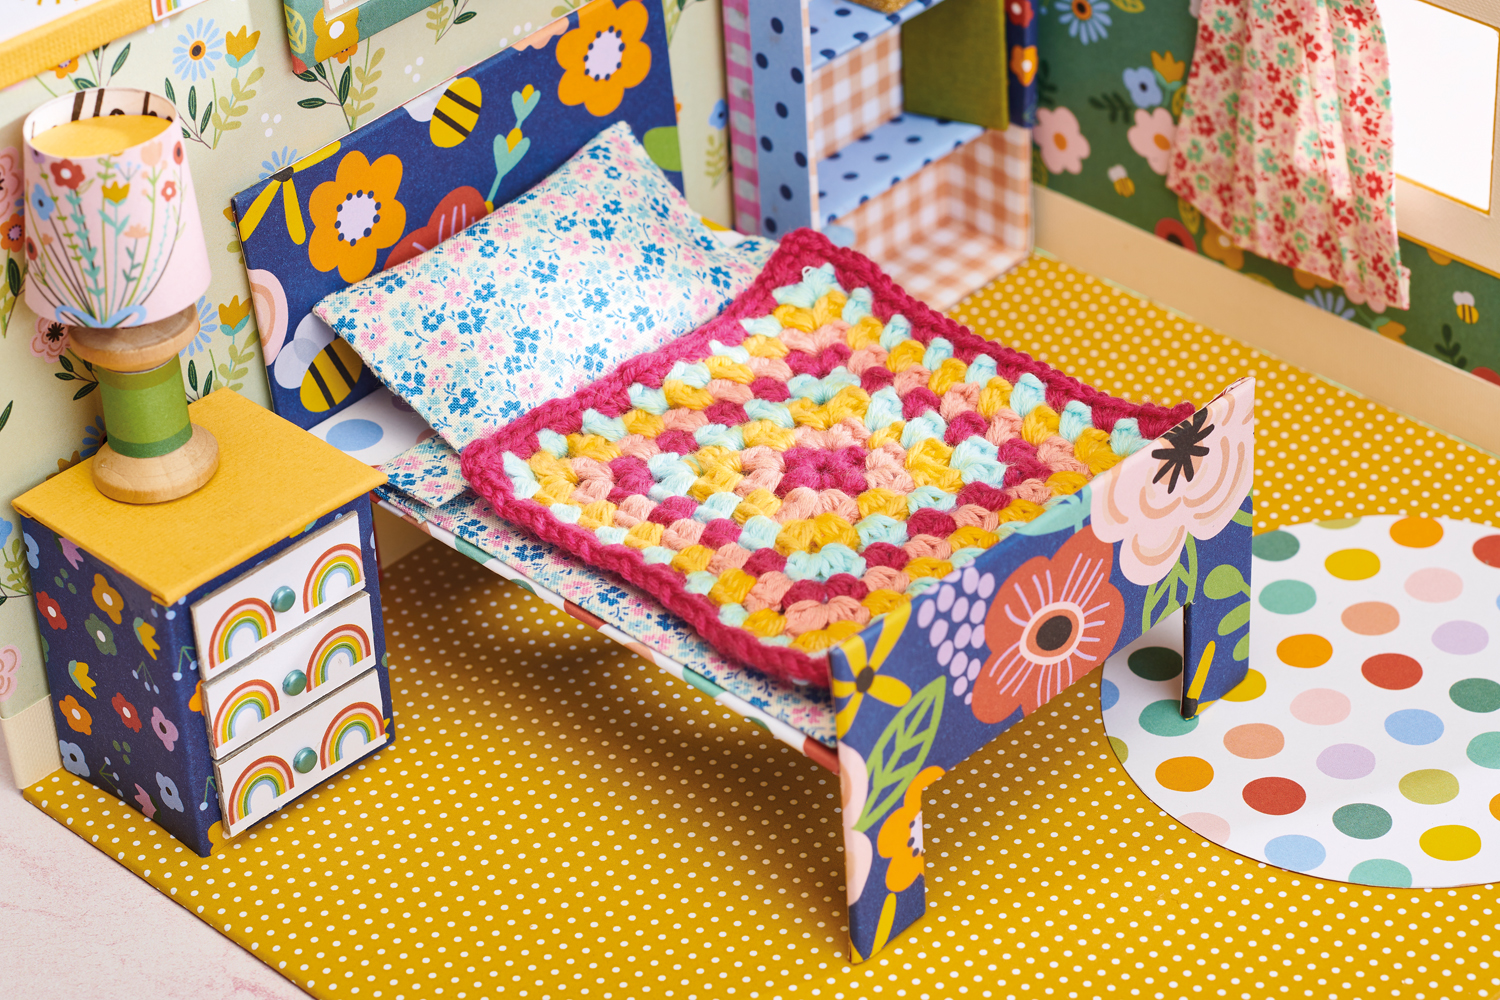
BED
1. Trim mountboard to 10cm x 13.5cm. Cover with patterned paper, fold the excess paper over the sides, mitring the corners, and cover the reverse with a 10cm x 13.5cm piece of coloured cardstock.
2. Cut two pieces of mountboard: both 10cm wide, one 6cm tall and the other 9cm tall. Snip a 2.5cm x 7cm rectangle from the bottom centre edge of each one to make the feet of the head and foot boards. Cover one side of each piece with patterned paper, folding the excess to the reverse and glueing down. Cover the reverse with a different paper cut to the same shape.
3. Glue 5mm x 8cm strips of mountboard together to make two stacks of four pieces, then wrap with plain cardstock to create a long block. Adhere to the underside at each end of the bed and leave to dry completely. Glue the headboard and footboard to each end of the bed, using the long blocks to keep each piece perpendicular. Leave one section to dry fully before attaching the other to avoid the legs sloping.
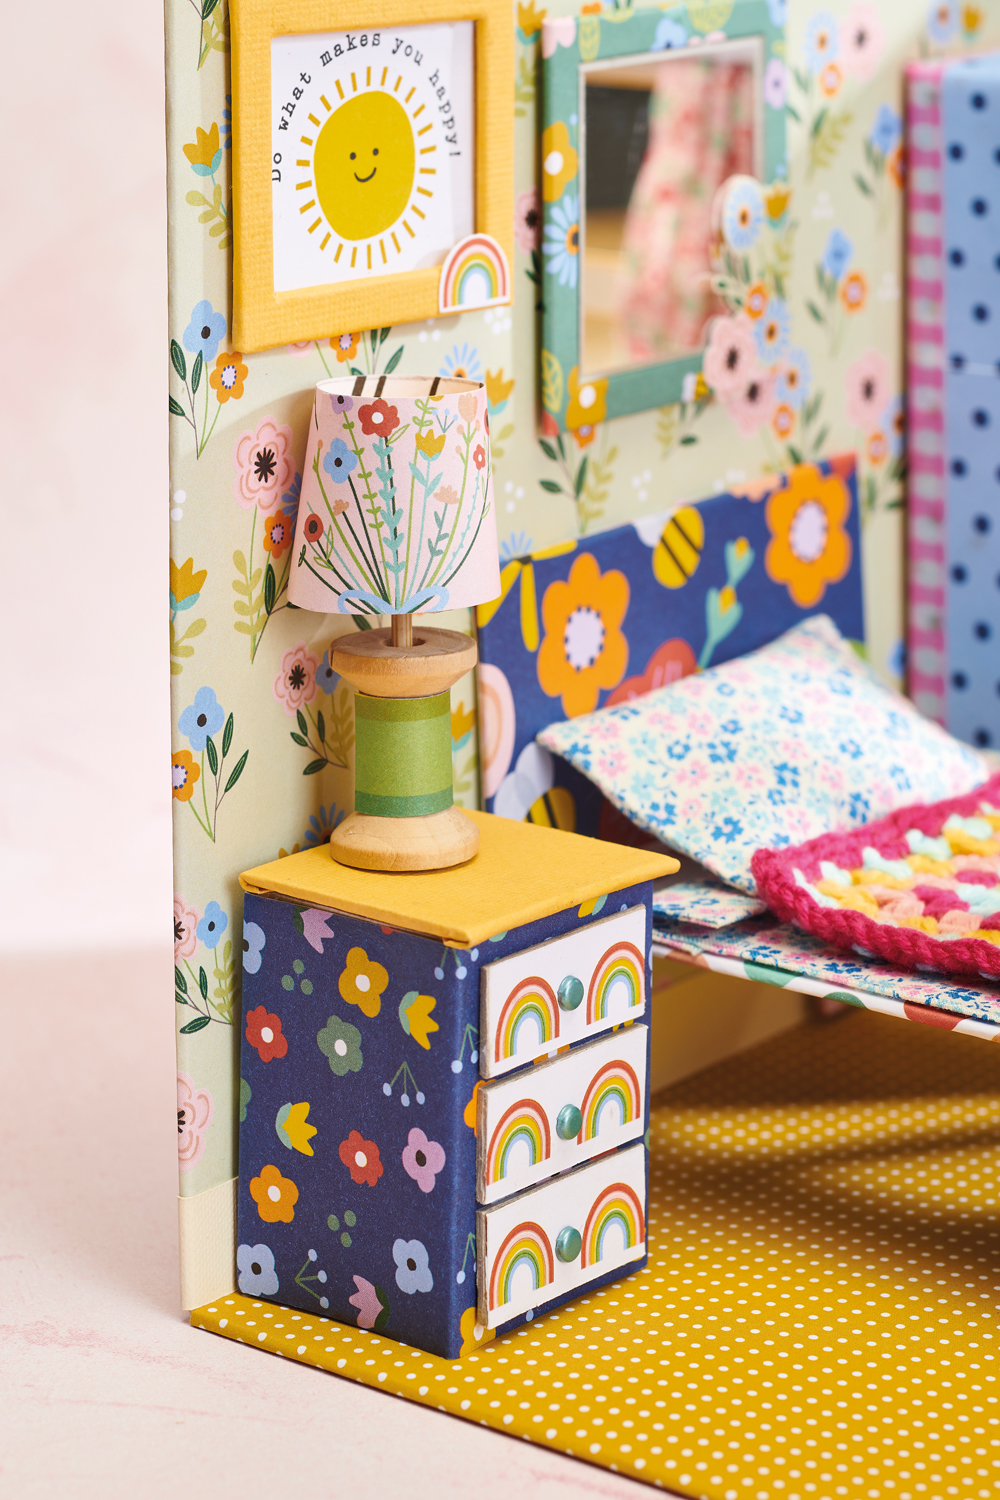
CHEST OF DRAWERS
1. Cut mountboard to 5.5cm x 19cm and half cut through it at alternating 4cm and 4.5cm intervals. Fold the board into a square tube and tape together. Snip a 4cm x 4.5cm rectangle of board and glue to one end of the tube with PVA. Leave to dry before covering the tube with patterned paper. Cut another rectangle of board to 4.3cm x 4.8cm. Cover with coloured cardstock and adhere to the other end of the tube to make a slightly overhanging tabletop.
2. Trim three pieces of leftover board to 1.5cm x 3.5cm and cover with decorative paper. Create a small hole in the centre of each piece and fit a small, coloured paper fastener to act as a handle. Glue the ‘drawers’ to the centre of the wider front of the chest, leaving a small gap between each one.
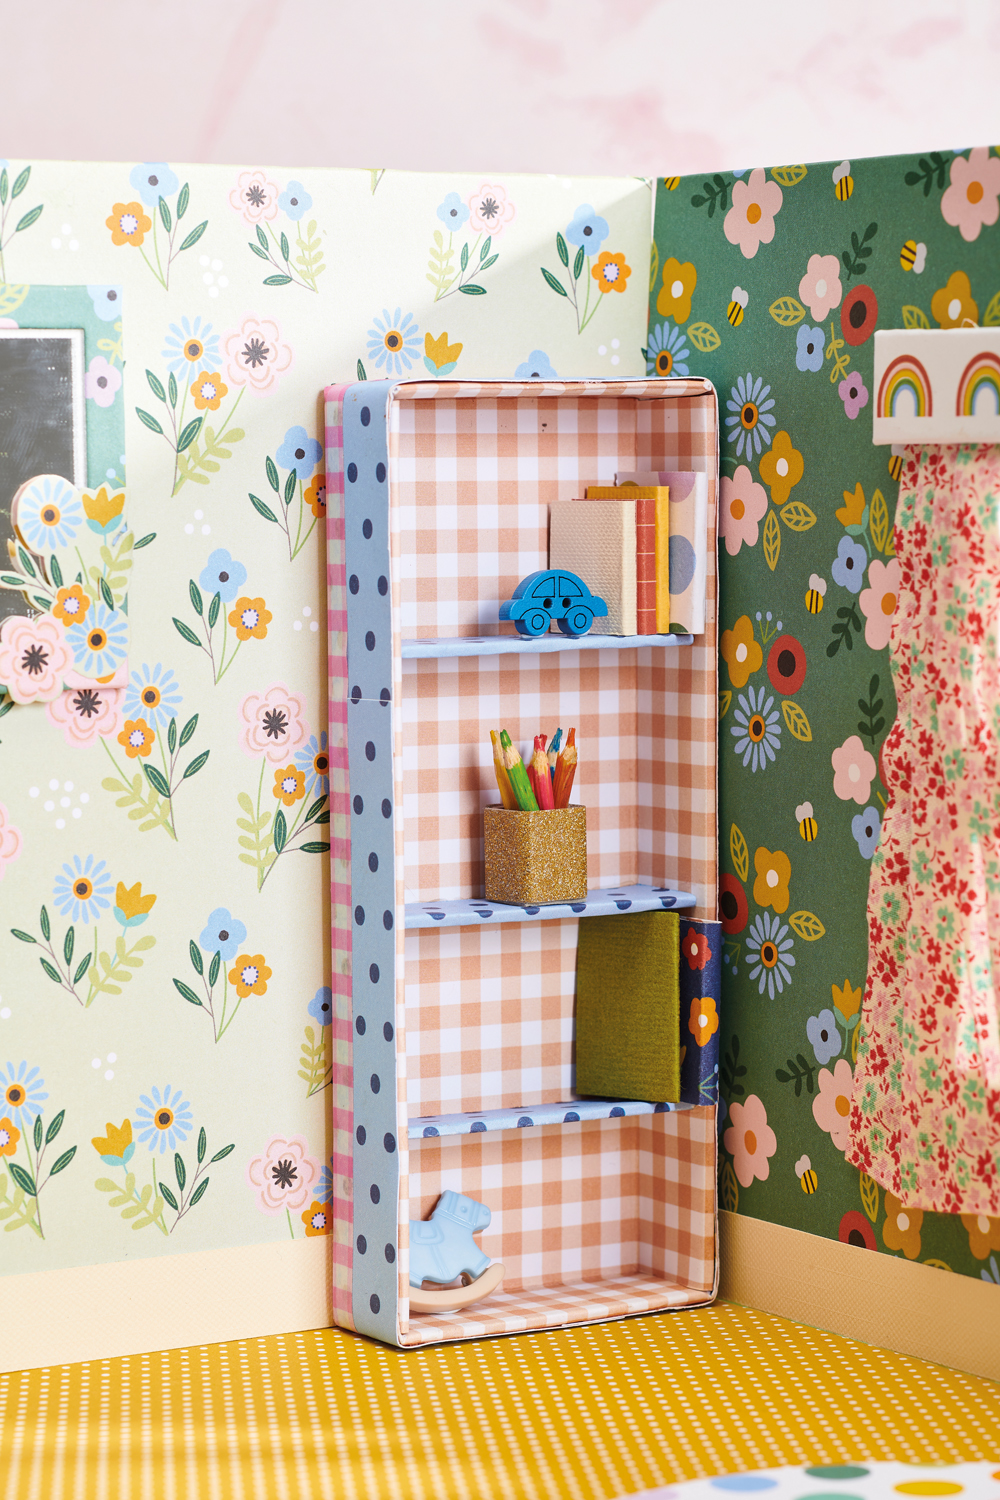
BOOKCASE
1. Take mountboard, 10cm x 19cm, and half-cut through each side, 2cm in from the edges. Fully cut the small square pieces out of each corner before folding the sides up to make a tray. Unfold and cover the uncut side of the board with lightly patterned paper, leaving a 2cm excess all around.
2. Fold up the sides before folding the excess over the edges and glueing down. Wrap the outside of the tray with 2cm wide strips of a different paper to hold the bookcase together. Neaten the back edges of the bookcase with patterned washi tape.
3. Measure the internal width of the bookcase (should be 5.8cm) and cut several shelves this long by 1.8cm deep. Cover with patterned paper trimmed to size and fix inside the bookcase with a tacky PVA glue, ensuring they are level before the glue dries.
TOP TIPS
- Using a glue like Pritt stick is best. You can even apply it on the curtain hems because it adheres well without the glue bleeding through the weave
- When covering mountboard, always cut the patterned paper slightly larger so it can wrap around and be fixed on the reverse – this eliminates messy edges
Stay tuned for part two! You’ll learn to make the lamp, mirror, picture, books, pencil pot, bed linen and blanket.

Busy lives often involve a lot of memos and reminders, and it can sometimes be hard to keep track. Luckily, we’ve got a sophisticated solution to keep your desk tidy and…

If you’re having a quiet Valentine’s with your beloved at home this year, make the place look a little more special with a speedy-to-make hearts frieze. Papercrafting doesn’t get much easier than…
Home decor Home decorations How to Papercraft Papercrafter Techniques Projects

1. Using a 3.5cm circle die, cut eight discs from chipboard and sixteen circles from patterned paper. Glue the patterned circles to either side of the discs and punch a…

Craft essentials
1. Cut a 5cm x 15cm strip of double-sided patterned paper and fold in half lengthways. Draw parallel pencil lines at 1.5cm and 2cm from the…


