


Card making Christmas cards Christmas crafts How to Techniques Card Making
Try our duo of unique card folds for something a little different this festive season
YOU WILL NEED:
Stephanie Weightman Deluxe Cardmaking Kit
Small magnets
Adhesives: glue, 3D foam pads

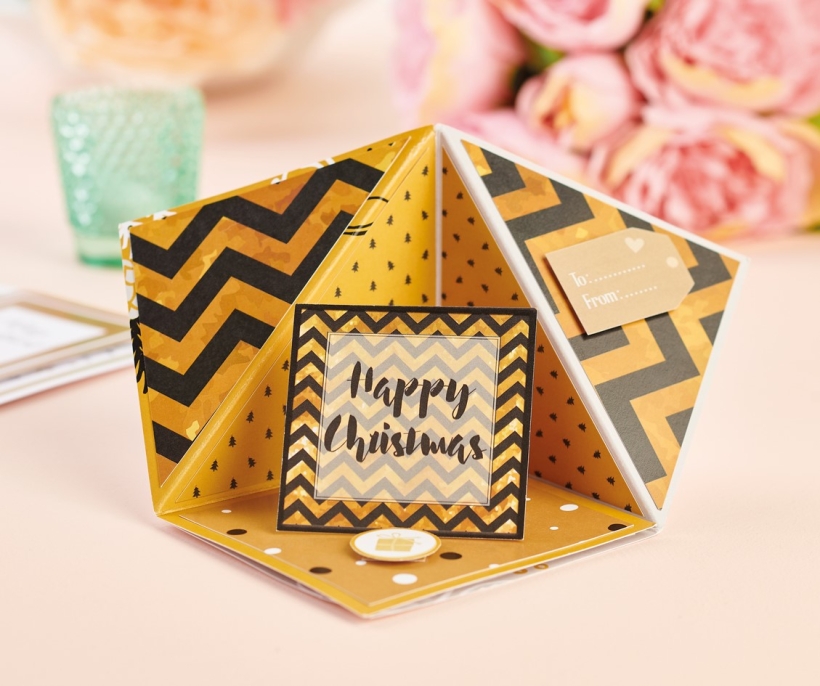
Pop-up card
1. Take two 11cm square cards and lay them flat, right side up. Score 1cm down the right-hand side of one and the left-hand side of the other to create a thin flap down each side. Adhere one flap on top of the other, then trim 1cm off the top and bottom. Valley fold the score lines. Score a line from the top in the centre down to the bottom-left corner next to the central score line. Repeat on the other side, then mountain fold both score lines.
2. Trim along the central score line from the bottom up to the middle point. Snip two contrasting papers to 9cm square and fix to the squares under the central fold, adding a small magnet under the paper on the right-hand side. Glue another magnet to the back of the other square. Decorate the triangles with contrasting papers, then add a tag on the right-hand side with 3D foam pads.
3. Trim a strip of card to 2cm x 8cm, then score at 4cm and 6cm. Attach the first score line to the reverse of a square sentiment panel. Stand the sentiment up as shown, then fix the end of the card strip to the base. Attach a small circular sentiment in front of the sentiment to act as a stopper.
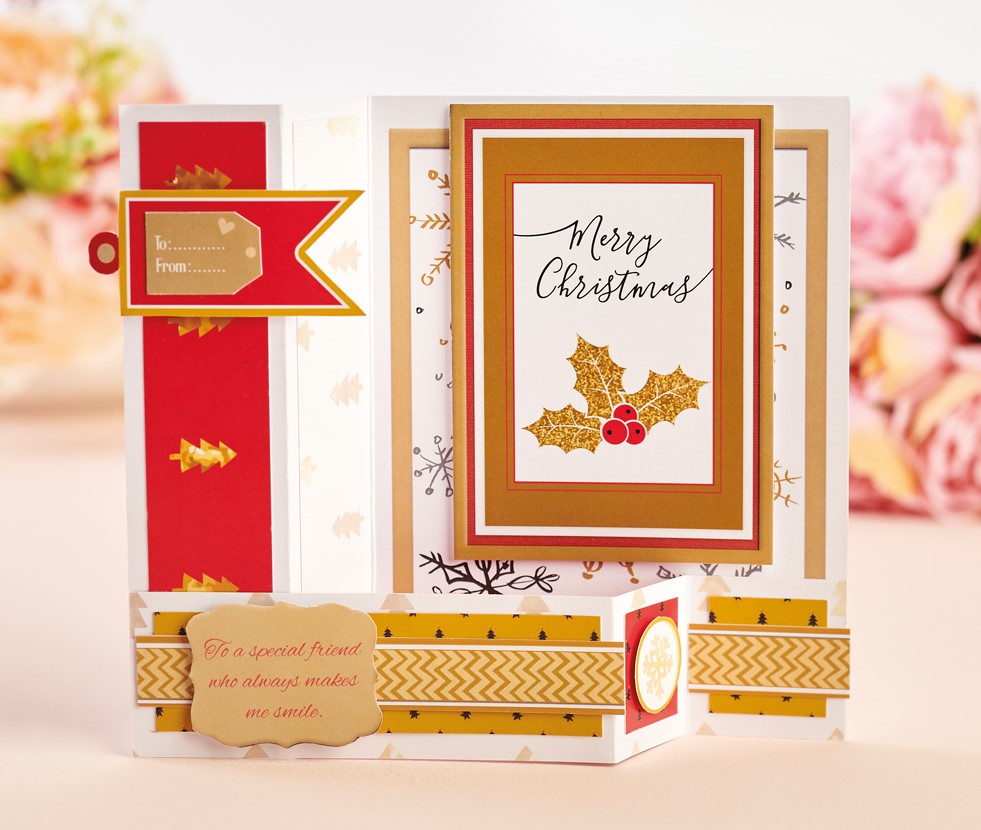
z-fold greeting
1. Lay a rectangular white blank flat, right side up, then trim the left-hand side down to 8cm wide. Score down at 4cm and mountain fold. Trim two contrasting papers to 3cm x 15cm, then adhere to the two panels on the left-hand side. Trim coordinating card to 4cm x 20cm, score at 12cm and 16cm, then mountain fold the first score line and valley fold the second. Decorate all three panels with patterned papers.
2. Fix a border across the first and third panel and attach a circular topper to the second panel with 3D foam pads. Adhere to the bottom of the card in the bottom corners to create a z-fold card. Attach a sentiment on the left-hand side and a large sentiment to the back panel with 3D foam pads. Secure a tag and star as shown with 3D foam pads.

Busy lives often involve a lot of memos and reminders, and it can sometimes be hard to keep track. Luckily, we’ve got a sophisticated solution to keep your desk tidy and…

If you’re having a quiet Valentine’s with your beloved at home this year, make the place look a little more special with a speedy-to-make hearts frieze. Papercrafting doesn’t get much easier than…
Home decor Home decorations How to Papercraft Papercrafter Techniques Projects

1. Using a 3.5cm circle die, cut eight discs from chipboard and sixteen circles from patterned paper. Glue the patterned circles to either side of the discs and punch a…

Craft essentials
1. Cut a 5cm x 15cm strip of double-sided patterned paper and fold in half lengthways. Draw parallel pencil lines at 1.5cm and 2cm from the…


