


Use our Uniko Coffee BEEans digi stamps to craft these pun-tastic cards!
YOU WILL NEED:
Craft essentials
Uniko Coffee BEEans digi stamps
Laser printer
Heidi Swapp MINC Machine
Heidi Swapp MINC Rose Gold Foil
Stamps: Uniko Birthday Wishes, Background Blocks Horizontal Stripe
Stamping tool, MISTI
Pencils, Prismacolor
Marker pens, Copic
Ink pad, VersaFine Onyx Black
Nuvo Drops: Liquid Mercury, Ebony Black, Dandelion Yellow
Glitter, fine
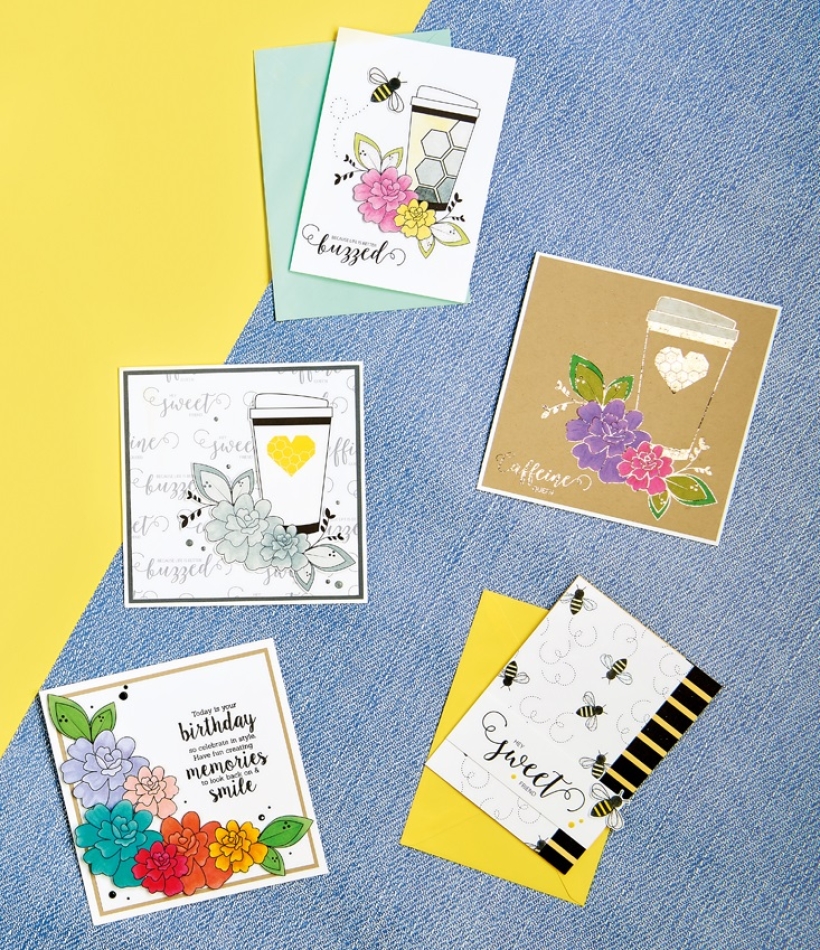
Buzzed
Create a 10.5cm x 14.5cm white blank. Using a computer programme, create a 10.5cm x 14.5cm document and place the honeycomb coffee cup digi stamp and a sentiment. Print the image twice. Trim one of the print-outs to fit the blank and colour the coffee cup and leaves. Adhere to the blank using double-sided tape. On the other print-out, colour the flowers and cut them out. Fix them to the card using foam adhesive. Print, colour and cut out a bee, then stick to the greeting leaving the wings free to ‘flutter’ Draw in some dots using a black fine liner to resemble movement of the bee and embellish the wings of the bee and the centre of the leaves using a glue pen and glitter.
Monochrome
Make a 14.5cm square white blank. Create a 13cm square document and place all the sentiments to fill the square and create a background. Change the opacity of the document to 50%, so the sentiments will print grey. Trim to size. Create another 13cm square document on your computer. Insert the heart coffee cup. Using a colour fill tool, change the heart from black to yellow and print. Trim the image and colour the flowers using Prismacolor pencils in shades of grey. Adhere the sentiment panel to grey card, 14cm square, and fix to the blank using double-sided tape. Stick the other panel on top using foam adhesive. Embellish with Nuvo Drops.
Caffeine Queen
On your computer, create a 14cm square document and insert the heart coffee cup digi stamp, enlarging it to fill the square. Add the ‘Caffeine Queen’ sentiment to the bottom-left corner. Print the document onto coloured card using a laser printer. Trim the print-out to size and follow the instructions to add foil to the image using the Heidi Swapp MINC Machine. Colour the flowers, leaves and cup lid using Prismacolor pencils. Secure the panel onto a 14.5cm square white blank using double-sided tape.
Birthday
Matt a 14.5cm square white blank with coloured card. Using a computer, create a new document. Place one of the coffee cup images and erase the coffee cup, leaving just the flowers. Enlarge the flowers and copy the image into the document twice more. Colour the flowers and leaves using Copic Markers and cut the flowers and leaves out. Stamp the sentiment from the Uniko Birthday Wishes Clear Stamp Set in VersaFine Onyx Black ink onto a 13.5cm square piece of card. Stick this layer to the greeting using double-sided tape. Adhere the flowers around the sentiment using foam adhesive. Embellish with Nuvo Drops.
Sweet
Create a 10.5cm x 14.5cm yellow blank. Using the Uniko Background Blocks Horizontal Stripe Clear Stamp and VersaFine Onyx Black ink, make a striped detail up the right side of it. Using a computer programme, create an 8.5cm x 14.5cm document and place the flying bee digi stamp randomly to fill the area. Change the direction of the bee by rotating the image. Print, trim to size, colour and embellish the bee wings with glitter. Print a sentiment and another bee slightly larger. Trim the sentiment panel and attach using foam adhesive. Trim and adhere the larger bee. Embellish with Nuvo Drops.

Busy lives often involve a lot of memos and reminders, and it can sometimes be hard to keep track. Luckily, we’ve got a sophisticated solution to keep your desk tidy and…

If you’re having a quiet Valentine’s with your beloved at home this year, make the place look a little more special with a speedy-to-make hearts frieze. Papercrafting doesn’t get much easier than…
Home decor Home decorations How to Papercraft Papercrafter Techniques Projects

1. Using a 3.5cm circle die, cut eight discs from chipboard and sixteen circles from patterned paper. Glue the patterned circles to either side of the discs and punch a…

Craft essentials
1. Cut a 5cm x 15cm strip of double-sided patterned paper and fold in half lengthways. Draw parallel pencil lines at 1.5cm and 2cm from the…


