


Card making Die cutting How to Papercraft Papercrafter Stamping Techniques
Learn to build heartwarming scenes on your cards with stamps, dies and stencils
There may be Copic shades aplenty, but you only need one Distress Oxide ink pad, and that’s the soft yet fundamental Speckled Egg. Use it with a variety of stencils to set the ultimate backdrop, then delight in the Lawn Fawn Butterfly Kisses range and set those Copics to work. From there you’ll build scenes, tell a story, mix it up. It’s a lesson from Francesca Vignoli in making your products work harder, so let’s begin shall we?
Switch up your stencils
Having a selection of stencils in your stash is paramount. They’re inexpensive and, so long as you clean them between each use, you’re set for life! Here we’ve used cloud, brick and grass varieties, which make for excellent starting points for the rest of your card designs. Really consider your ink. The Distress Oxide Speckled Egg ink pad is a gorgeous shade that doesn’t hog the limelight Is stencilling your focal point? You’ll want to intensify your colour choice.
Go colourless
OK, so we’ll be the first to admit these cards have a lot of white on them. There’s a reason for that. The overall tone is soft and muted, with breathing room, and that’s not all. When colouring in, it’s easy to hark back to our childhoods and fill the entire shape. Turn down the volume and consider when less is more. For the clouds, very lightly apply blue to the bottom of each cloud, blending up – you’ll see they’re barely coloured in, and the look is incredibly realistic.
Build your scenes
The benefit of a stamp set featuring lots of little motifs is that you’ve got options. Endless combinations. That’s where these build-a-scene cards stemmed from – we wanted to show different settings with the same collection, which in this case is Lawn Fawn Butterfly Kisses. Minor tweaks make all the difference, as can big structural decisions. Why not create two scenes on one card? Let the stencilled background dictate? See what combos you can come up with.
You Will Need:
Stamps, Lawn Fawn Butterfly Kisses
Dies, Lawn Fawn Butterfly Kisses
Stencils: Lawn Fawn Brick, Thought Bubbles, Grassy, Cloudy
Inks: Distress Oxide Speckled Egg, Memento Espresso Truffle
Copic markers: E43, E41, E04, E11, E71, Y17, YR04, YR31, RV02, RV10, RV13, B00, BG10, BV00, YG23, G14
Pens: glitter, white gel
Cardstock, white
Masking tape
Sequins, iridescent
Ink-blending tool
Adhesives: liquid, 3D foam pads
Die-cutting machine
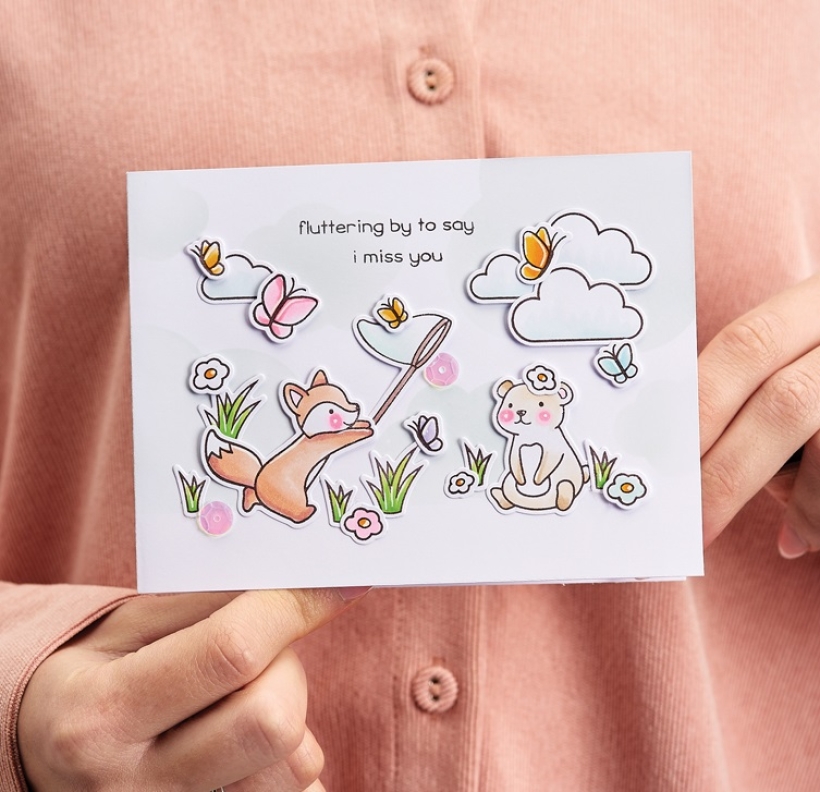
Cloud Stencilled Butterfly Card
1. Create a side-folding 10.5cm x 14cm white landscape blank. Cover the bottom 2cm with masking tape to block it off. Mask the little circles on the Thought Bubbles stencil to only work with the cloud shapes and ink the background with Speckled Egg ink.
2. Stamp, colour and die cut a selection of images, then adhere with liquid glue, using 3D foam pads to layer some motifs on top. Stamp a sentiment at the top with Memento Espresso Truffle ink. Add some sparkle with a glitter pen and iridescent sequins, then apply ‘shine’ with a white gel pen.
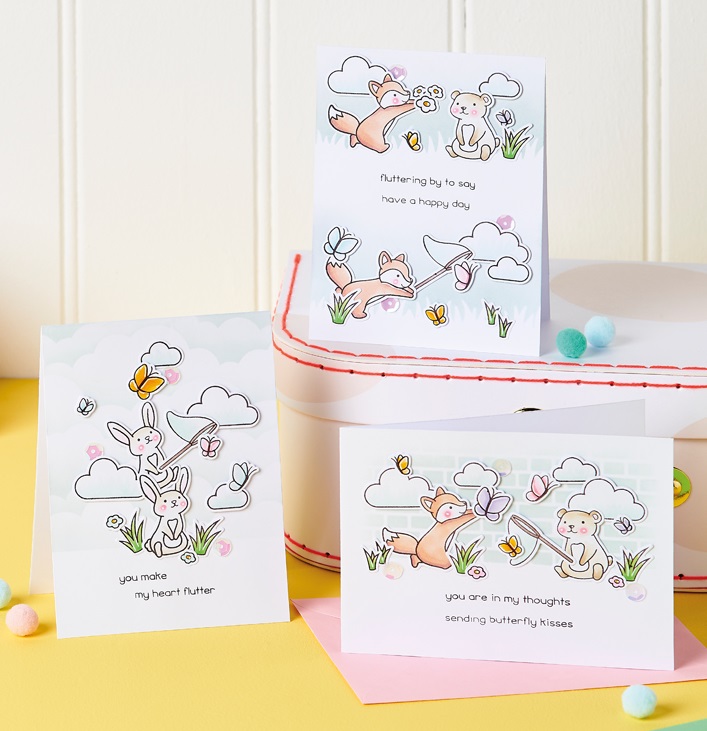
Cloud Stencilled Butterfly & Bunny Card
1. Make a top-folding 10.5cm x 14cm white portrait blank. Adhere masking tape to the bottom 4cm to cover it. Apply Speckled Egg ink to the rest of the card through the Cloudy stencil. Remove the mask and stamp a sentiment at the bottom with Memento Espresso Truffle ink.
2. Stamp, colour and die cut the images. Arrange them in a cluster to create a scene, using both glue and 3D foam pads. Add a few iridescent sequins and sparkle with a glitter pen, before finishing with white gel pen highlights.
Grass Stencilled Butterfly Card
1. Position a Grassy stencil onto a top-folding 10.5cm x 14cm white portrait blank, 1.5cm from the bottom. Colour above it with Speckled Egg ink, fading into white towards the middle of the card. Reposition the stencil 5cm from the top and repeat the process, working your way down.
2. Let the ink dry completely, then stamp a sentiment onto the white gap in the middle with Memento Espresso Truffle ink. Stamp, colour and die cut a selection of motifs, then adhere as two landscape scenes with glue and 3D foam pads. Use a white gel pen, glitter pen and iridescent sequins to add sparkly details.
Brick Stencilled Butterfly Card
1. Create a side-folding 10.5cm x 14cm white landscape blank. Mask off the bottom 4cm with tape, then use Speckled Egg ink through a Brick stencil on the remainder of the card, leaving a border all around.
2. Stamp, colour and die cut various motifs, then adhere with glue and 3D foam pads. Stamp a sentiment at the bottom with Memento Espresso Truffle ink. Finish with white gel pen and glitter pen highlights, then iridescent sequins.
TOP TIPS
- Each card has just three sequins: the perfect amount of sparkle
- Mask off sections you don’t want to ink with tape or Post-it notes
- Add highlights to the coloured-in toppers with a white gel pen

Busy lives often involve a lot of memos and reminders, and it can sometimes be hard to keep track. Luckily, we’ve got a sophisticated solution to keep your desk tidy and…

If you’re having a quiet Valentine’s with your beloved at home this year, make the place look a little more special with a speedy-to-make hearts frieze. Papercrafting doesn’t get much easier than…
Home decor Home decorations How to Papercraft Papercrafter Techniques Projects

1. Using a 3.5cm circle die, cut eight discs from chipboard and sixteen circles from patterned paper. Glue the patterned circles to either side of the discs and punch a…

Craft essentials
1. Cut a 5cm x 15cm strip of double-sided patterned paper and fold in half lengthways. Draw parallel pencil lines at 1.5cm and 2cm from the…


