


Love decorating boxes or thinking of starting a small business? The wooden boxes from The Craft Mill and their dedicated site The Wooden Box Mill promise excellent value and massive discounts, allowing the buyer a bigger margin to sell on themselves.
Wooden box, (craftmill.co.uk or12" x 12" Paper Pack, Bo Bunny, The Avenues Collection; buttons, PaperCrafter Studio Selection Designer Papers, Pen, black
Don’t miss the other products either, which range from wooden tags and trays, to tissue boxes, letters and lots more. 0161 484 5888, craftmill.co.uk, thewoodenboxmill.co.uk
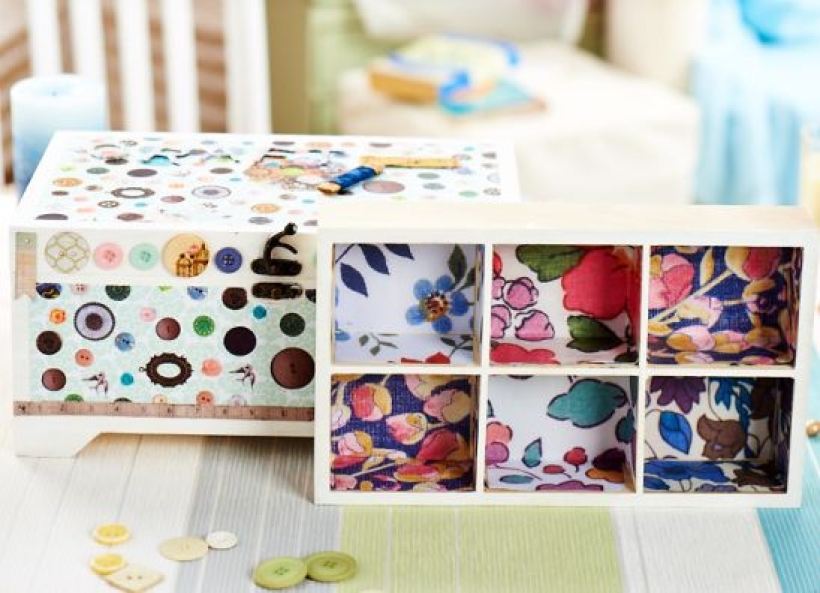
Feeling inspired by our crafty box? With all of the handy compartments, it’s the ideal place to keep our crafty knick-knacks safe and accessible in our next craft sesh. Read the guide below for how we whipped it up, although you may want to delve into your stash and PaperCrafter kit as well.
• Start by sanding the wooden box to remove any splinters and so it is smooth for painting. When satisfied, evenly apply a coat of white paint. Leave to dry, apply a second coat of white paint and then leave to dry again
• If the box has an inside compartment like ours did, you may wish to remove this and also repeat the sanding down and painting process. To ensure the surfaces are all smooth, run a napkin along the edges and make sure it doesn't snag.
• Select a style of paper that you wish to decorate the box with. Choosing which of the panels to cover (we chose the top and the front), measure the paper to fit each panel, leaving a 1cm border.
• When measuring the front panel, mark in pencil where the bottom lock fastener is and draw around it in a neat curve. Remove the spare paper with a craft knife.
• Apply decoupage glue to the panel you wish to cover and start attaching the paper, starting in one corner and working outwards, smoothing any air bubbles out as you go with your fingertip.
• Administer another layer of glue on top of the paper sections to seal it and leave to dry, also ensuring that most of the air bubbles have gone — although don't worry if it isn't smooth because these often deflate whilst drying.
• Whilst the box dries, consider working on any inside compartments or the inside of the box. To decorate ours, we used designer papers and experimented with different patterns in each sections. Although it might be easier to use a 'plus-sign' type template for each little box, pasting smaller sections onto the base and sides may give a neater finish.
• Once the box is dry, you can have fun embellishing! Using chipboard letters from previous PaperCrafter kits or other kinds, spell out a word or phrase (we chose CRAFT). Paint the letters white and once dry, draw across in horizontal lines with black pen.
• Finish by embellishing the box with bits from your stash. We used adhesive buttons, some old scraps of fabric and vintage spool.

Busy lives often involve a lot of memos and reminders, and it can sometimes be hard to keep track. Luckily, we’ve got a sophisticated solution to keep your desk tidy and…

If you’re having a quiet Valentine’s with your beloved at home this year, make the place look a little more special with a speedy-to-make hearts frieze. Papercrafting doesn’t get much easier than…
Home decor Home decorations How to Papercraft Papercrafter Techniques Projects

1. Using a 3.5cm circle die, cut eight discs from chipboard and sixteen circles from patterned paper. Glue the patterned circles to either side of the discs and punch a…

Craft essentials
1. Cut a 5cm x 15cm strip of double-sided patterned paper and fold in half lengthways. Draw parallel pencil lines at 1.5cm and 2cm from the…


