


Card making Home decorations Papercrafter
With everyone’s favourite holiday just around the corner (there’s only four weekends to go until the big one!), our papercrafting days are slowly counting down to the big day!
Craft Essentials, Foam Ring, Heart die, Star die, Sequins, 3D paint, Buttons, Quilling tool
Get in the Christmas crafting mood with these four selected crafts to get you into the festive spirit! From cards to decorations for the home, every base is covered here, ensuring you can make the most of this joyous season and create a stunning new make every weekend until Christmas!
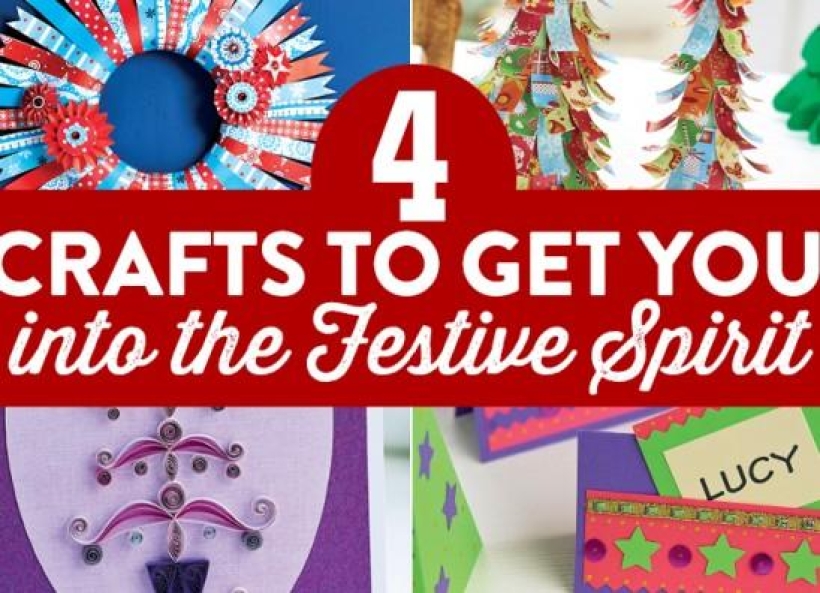
• Spend your first weekend making up this eye-catching Corinne Bradd door hanger. The Nordic-style themed shades of icy Alpine blue and Scandi reds are sure to be a winner, and a welcoming decoration for your guests to feast their eyes on.

• Choose some festive papers and cut approximately forty 1.5cm x 21cm strips from alternating patterns. Apply glue to the centre of the plain side of a strip, wrap it around a foam ring and glue the ends together evenly so they face outwards.
• Wrap the next strip around the ring in the same way, so that it partially overlaps the previous piece. Continue wrapping all of the strips in this way, alternating between patterns. Once the glue is dry, snip the ends of each paper strip into a pennant. Glue a looped length of paper to the back of the wreath to act as a hanger.
• Take two 2cm x 30cm lengths of patterned paper, crease each one into a concertina and glue together at the joining ends to form a rosette. Make several of these from different papers. Add a circular motif to the centre of each rosette and glue a gem to each one. Attach the rosettes to the wreath as shown.
• No Christmas dinner table is complete without some handmade placecards, and these Cathie Shuttleworth designs put a contemporary spin on a traditional colour scheme, by swapping red, green and gold for funky shades of green, pink and purple.

• Cut an assortment of small cards from blanks, folding at the top. Face the front with a strip of paper glued only at the sides and bottom, leaving the top open. Embellish with sequins, 3D paint and paper shapes.
• Create a rectangle from contrasting paper and punch a heart or star in the end. Use zigzag scissors to shape the edge and decorate with paint and pink paper. Face the card with a name printed or handwritten onto cream paper.
• These festive layered paper trees are an ideal centrepiece for any table or mantelpiece. Who says you should only have one Christmas tree up in your house?

• Take a sheet of A4 or A5 coloured card and curl into a tall cone. Secure with tape before cutting the bottom of the cone level so it stands straight. Take several sheets of paper in shades of red, orange, cream, green and blue. Cut into 1.5cm x 4cm strips. Curl each strip, pattern side down, over the blade of a pair of scissors.
• Wrap a length of double-sided tape around the bottom of the cone, 3cm up from the edge. Press individual curled strips onto the tape, placing each one close to the last and alternating the colours. Wrap a second length of tape 3cm above the first and repeat. Continue adding curled strips to the cone in this way. As you reach the point, taper one end of each curled strip so it adheres to the cone more easily.
• Cut out five star shapes from different papers. Fold each one in half and glue together to make a 3D shape. Use PVA glue to fix the star to the top of the cone.
• Master this crafting technique and add a touch of graceful elegance to all of your future projects by learning how to quill.

• Create a white card blank, 12.5cm x 17.5cm, mount with purple card, 11.5cm x 16.5cm, then add a lilac oval shape,14.5cm tall. For the star, roll a silver-edged strip 15cm long. Glue down the end of the coil and pinch firmly into a star shape.
• For the tree trunk, create coils and eye shapes (pinch a coil at both ends). Place a mauve strip on top of a white strip, then roll both strips together in the quilling tool. Make the coils as follows: two 3.5cm coils; two 5.5cm coils; one 7.5cm coil and an 11cm coil. Craft one 3.5cm eye; three 5.5cm eyes; one 7.5cm eye and an 11cm eye.
• Make the 'P' shapes using two strips; mauve on top and white underneath. Fold in half and place all four ends in the quilling tool before rolling up. Create the shapes as follows: two 3.5cm strips; four 5.5cm strips; four 7.5cm strips and two 11cm strips.
• For the pot, make three triangles from 22.5cm purple strips. Roll into coils, glue down and pinch into three identical triangles. Apply these together, then neaten the whole shape with another strip, adhered round the edge.
• Assemble all the pieces on the card. Glue the trunk down first, making sure it is straight. Create a selection of baubles from 5.5cm strip coils, and hang them on the tree.

Busy lives often involve a lot of memos and reminders, and it can sometimes be hard to keep track. Luckily, we’ve got a sophisticated solution to keep your desk tidy and…

If you’re having a quiet Valentine’s with your beloved at home this year, make the place look a little more special with a speedy-to-make hearts frieze. Papercrafting doesn’t get much easier than…
Home decor Home decorations How to Papercraft Papercrafter Techniques Projects

1. Using a 3.5cm circle die, cut eight discs from chipboard and sixteen circles from patterned paper. Glue the patterned circles to either side of the discs and punch a…

Craft essentials
1. Cut a 5cm x 15cm strip of double-sided patterned paper and fold in half lengthways. Draw parallel pencil lines at 1.5cm and 2cm from the…


