


Home decor Home decorations How to Papercraft Papercrafter Techniques Paper Art
Use patterned papers to create Corinne Bradd’s 3D masterpiece
You Will Need:
Templates
Patterned papers, Simple Stories Hello Today
Cardstock, various colours
Punch, flower
Florist’s wire
Baker’s twine
Paper straw
Pinking shears
Glue
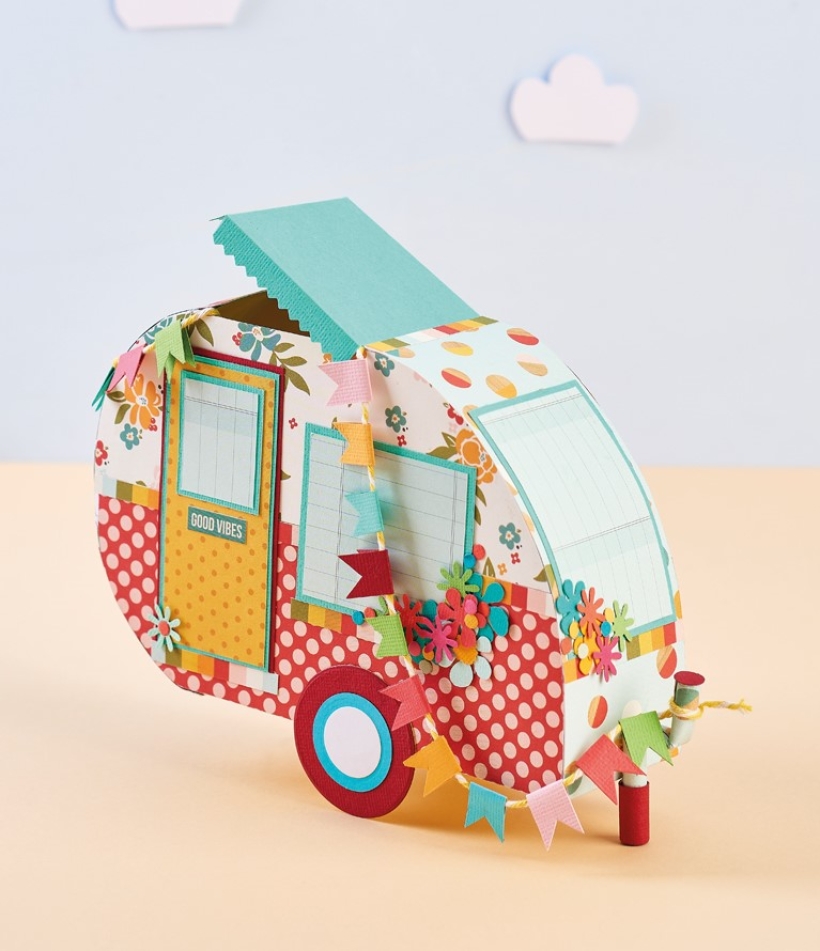
3D Camper
1. Download the templates, then cut and score a caravan shell from plain cardstock. Snip a front and back from patterned paper, clip notches into the edges and score on the long sides where indicated. Gently curl the side pieces with your fingers, before fixing them to the caravan shell, either side of the base piece, glueing the tabs to the outside of the shell and leaving a gap in the top of the caravan.
2. Trim two mirrored sides from patterned paper, adhering two designs together if desired and covering the join with a narrow strip of a third pattern. Glue these to the caravan shell, covering the tabs. Cut door and window pieces from patterned paper and layer onto a deeper shade of cardstock. Fix these to the sides, front and back of the caravan and decorate with small punched flowers in a variety of colours.
3. Cut concentric circles of coloured card no wider than 4.5cm. Layer together and glue to each side of the caravan so that half of each extends below the base. Snip a 4cm x 7cm panel of cardstock and glue around a 7cm long piece of paper straw. Place florist’s wire, 6cm long, inside the straw and make a double bend in the tube to create the tow hitch. Cap off the top end with a small disc of card, add an extra band of card around the base, and stick to the front end of the caravan with strong PVA glue.
4. Trim several pieces of coloured card into 1.2cm x 4cm strips. Fold each in half. Glue over a length of baker’s twine and snip the bottom edges into pennants. Knot the ends of the twine, then secure inside the roof gap and around the tow hitch. Cut blue cardstock, 8cm square, and score 1cm in on each edge. Snip away the intersections at the corners and trim three sides with pinking shears. Glue the remaining 1cm wide section inside the front of the roof gap and fold so the panel can lift up.
Top tip: How clever! Use grid-style paper to imitate blinds on the windows

Busy lives often involve a lot of memos and reminders, and it can sometimes be hard to keep track. Luckily, we’ve got a sophisticated solution to keep your desk tidy and…

If you’re having a quiet Valentine’s with your beloved at home this year, make the place look a little more special with a speedy-to-make hearts frieze. Papercrafting doesn’t get much easier than…
Home decor Home decorations How to Papercraft Papercrafter Techniques Projects

1. Using a 3.5cm circle die, cut eight discs from chipboard and sixteen circles from patterned paper. Glue the patterned circles to either side of the discs and punch a…

Craft essentials
1. Cut a 5cm x 15cm strip of double-sided patterned paper and fold in half lengthways. Draw parallel pencil lines at 1.5cm and 2cm from the…


