


Home decorations Papercrafter Revamping Techniques
Give your Halloween celebrations an extra touch of terror with these Spooky Luminaries made with the Cricut Explore.
Cricut Explore™ machine, Cricut Design Space™ software, 12” x 12” standard grip cutting mat, Cricut Scoring Stylus, Cricut tool set, Double sided paper: 1 x yellow; 1 x orange; 1 x grey (A4 size), A4 White card stock, A4 Black glitter paper, Adhesive, Tealight holder and tealight/ battery operated tealight
The Cricut Explore is a new design and cut machine that gives anyone the creative freedom to make just about anything. Perfect for producing professional-looking projects, the sleek new Cricut Explore combined with an easy-to-use online design space, lets users create an array of items from home décor for interior design fashion designs, party decorations or cards and gifts.
The machine is great for so many projects and occasions, so every week in September we’re posting to show you a fab Halloween makes – see how to make last week’s Goulish Candy Containers by clicking here
• Connect the Cricut Explore™ to the pc/laptop/Mac. Log on to your Design Space™ account, search for ‘parties & events’ in the categories and select the Halloween Luminaries project.

• Click on ‘Customise’.

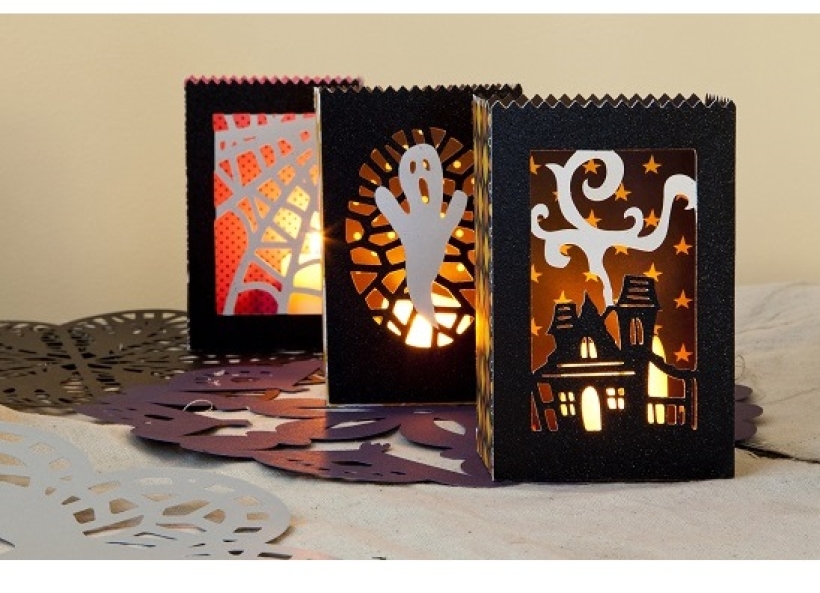
• Resize the images as required by first highlighting the image and then dragging the corner point. The size appears in a black text box as the image is altered. The project makes luminaries that are 4.5” x 3”.

• Score and cut the images from the double sided papers and card. Use the spatula to remove the images from the mat. This will minimise the damage to them and the mat. Use the weeder tool to remove any tiny pieces stuck within the cut.
• Carefully fold the luminaries along the score lines then glue the side and bottom tabs to make a box shape.
• For the spider web / haunted house: adhere the white base to the front of the luminary. Trim away the web / smoke from the black image. Adhere the remaining black image to the white front.
For the ghost: adhere the black base to the front of the luminary. Trim the ghost image from the white card and adhere it over the black base.
• Stand on a flat surface and put a tealight (battery operated is safest) inside for a spooky effect after dark.
Have you got your hands on a Cricut Explore yet yet? If you haven’t then go to the Cricut website and see what this fabulous new piece of kit can do.

Busy lives often involve a lot of memos and reminders, and it can sometimes be hard to keep track. Luckily, we’ve got a sophisticated solution to keep your desk tidy and…

If you’re having a quiet Valentine’s with your beloved at home this year, make the place look a little more special with a speedy-to-make hearts frieze. Papercrafting doesn’t get much easier than…
Home decor Home decorations How to Papercraft Papercrafter Techniques Projects

1. Using a 3.5cm circle die, cut eight discs from chipboard and sixteen circles from patterned paper. Glue the patterned circles to either side of the discs and punch a…

Craft essentials
1. Cut a 5cm x 15cm strip of double-sided patterned paper and fold in half lengthways. Draw parallel pencil lines at 1.5cm and 2cm from the…


