


Christmas crafts Origami Stamping Paper Art
Counting down the days to Christmas is much more fun with a handmade advent calendar, filled with mini gifts and handwritten notes for a loved one. Try your hand at these folded paper pouches today and you’ll be finished by 1st December - trust us!
Please login to download. Sign in here
Craft essentials, patterned wrapping paper, snowflake and scallop-edged circle dies, numerical stamps, sturdy cardboard, mini pegs, brown ink pad , online template
We’d love to see your Christmas makes, so why not share your pics to our Facebook wall or tweet us @PaperCrafterMag and we could even share them for you. Happy Christmas crafting!
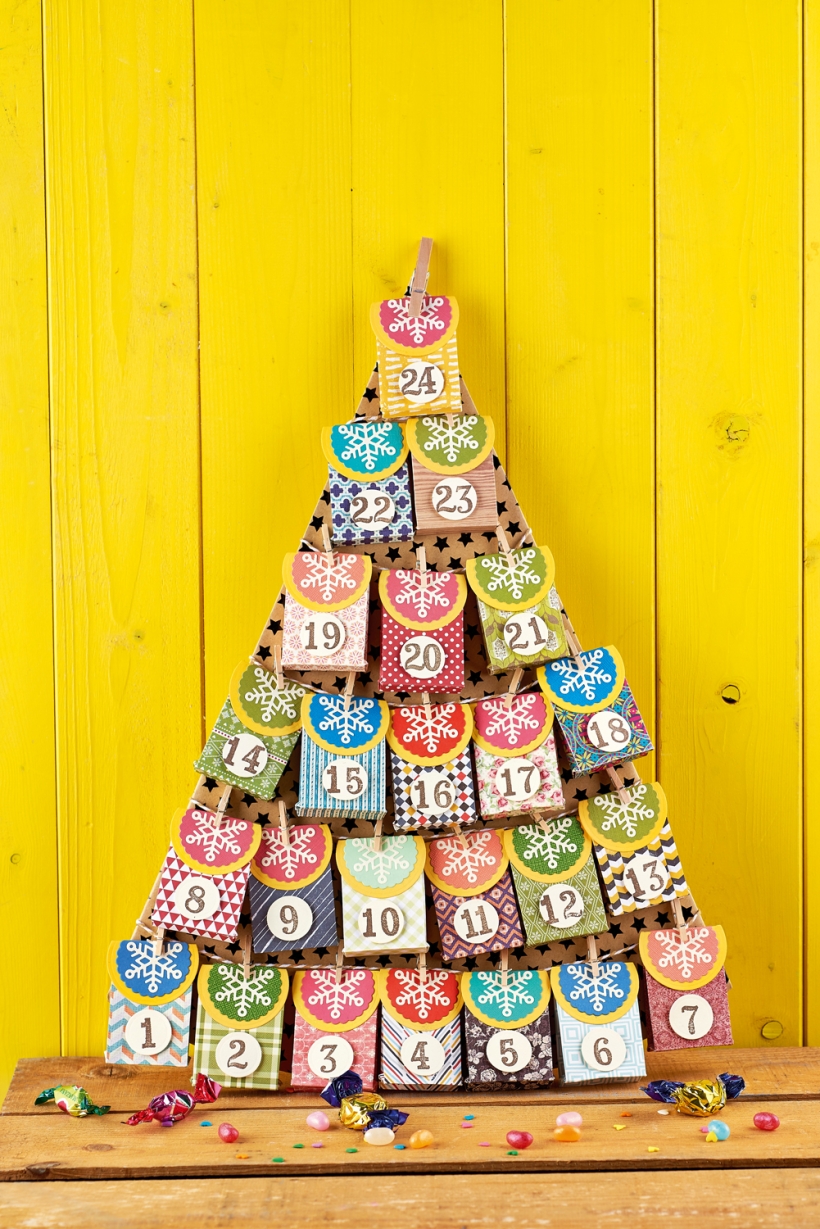
• Create a triangle tree with a curved base from a 32cm x 45cm piece of sturdy cardboard. Cover the cone shape with wrapping paper, securing on the back. Secure a loop of twine to the back to hang. Tape five more lengths of twine across the tree at 7cm intervals from the top without pulling the string too taut
• Download and print the bag template from our website. Cut along the outside on patterned paper and score the dotted lines. Crease the score lines and concertina fold the centre ones to make the base of the bag
• One at a time, fold up the sides, then bring them together, creasing the excess paper at the corner at a 45° angle. Glue the side tabs together. When the glue is dry, crease down the centres of the sides to mimic the concertina fold on the bottom
• Die-cut a 5cm circle from yellow card, glue a 4cm scallop-edged circle of a different colour on top, then add a die-cut snowflake to the centre. Glue the edge of the circle to the top edge of a bag and fold over to make a flap
• Make a total of 24 paper pouches in this way, using different coloured card and patterned papers. Use a 2.5cm circle die to create 24 discs from cream card. Stamp numbers 1-24 on each with brown ink and leave to dry
• Fix a number to the front of each bag using 3D foam pads, then fill them with small treats. Clip each bag onto one of the twine lines with a mini peg. You can arrange them in numerical order or by colour and pattern

Busy lives often involve a lot of memos and reminders, and it can sometimes be hard to keep track. Luckily, we’ve got a sophisticated solution to keep your desk tidy and…

If you’re having a quiet Valentine’s with your beloved at home this year, make the place look a little more special with a speedy-to-make hearts frieze. Papercrafting doesn’t get much easier than…
Home decor Home decorations How to Papercraft Papercrafter Techniques Projects

1. Using a 3.5cm circle die, cut eight discs from chipboard and sixteen circles from patterned paper. Glue the patterned circles to either side of the discs and punch a…

Craft essentials
1. Cut a 5cm x 15cm strip of double-sided patterned paper and fold in half lengthways. Draw parallel pencil lines at 1.5cm and 2cm from the…


