


Create a card and a napkin ring with our paper folding and pinching techniques
Craft Essentials, Online template, McGill Petite Petals Punch, Decorative border punch, Florist wire, Ink: pink, gold, Gems, Glitter glue
It’s time to up your crafting game and add some wow to your creations. Paper flowers like these make a showstopping focal on any project. Here, Jenny Pearce takes you through different techniques for making beautiful blooms.
I often use paper flowers in my craft projects, because they add an instant touch of beauty. There are many ways to create your own, each resulting in a different effect. You could simply punch or die cut the shape or you can make a 3D creation by rolling, layering, curling, folding, quilling or fringing paper. I’ve used a variety of techniques that you can try in your card making, scrapbooking, gift wrap and more.
Various methods will result in different flower types. The kind of paper you use will also make a big difference. Flowers made from newspaper or old book pages have a lovely vintage feel to them, whereas glossy patterned papers will feel more contemporary. Delicate materials such as vellum, tissue paper or even doilies can be great when making wedding flowers, but you might choose something sturdier for everyday blooms. The possibilities are endless.
Flowers suit almost any occasion: use bright blooms for birthday cards, red roses for Valentine’s Day, daffodils for Easter and poinsettias for Christmas. You only need small pieces of paper, so they’re great for clearing out your stash. The difficulty level is entirely up to you – it’s amazing what you can make with some paper and a little imagination.
• Cut a 7.5cm circle and a 5cm flower from patterned paper. Score down the centre of the circle. Mark diagonal lines out from the end of the line, creating a starburst pattern.

• Crease along these lines to create a concertina effect. Pinch the petal together at the pointed end and stick to the reverse of the 5cm flower. Make four more petals and glue around the flower, then add a gem to the centre.
• Cover a 15cm x 21cm card blank with patterned paper and attach the bloom to the left of it. Stick ribbon across the bottom of the card and add a sentiment on top of it, then embellish with gems.
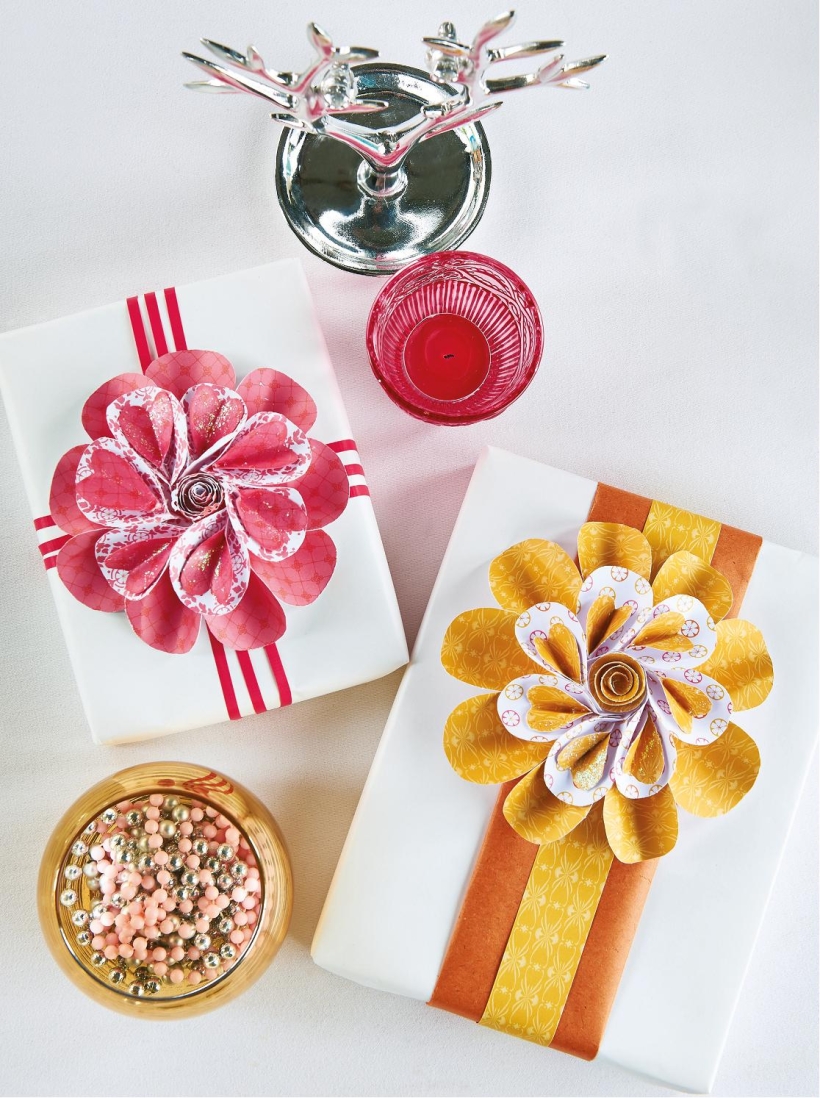
• Cut a 5cm circle from paper. Using the template, trim nine large petals from patterned paper, pinch at the base and glue. Stick around the circle

• Repeat to create seven smaller pinched petals out of white patterned paper. Punch a decorative border along a strip of paper and roll into a coil. Stick upright on a 5cm circle

• Cut seven heart petals from coloured paper. Ink the edges and fold in half. Pinch and stick the bases, then glue to each white petal. Fix them at an angle around the flower’s coiled centre

• Attach the smaller flower on top of the larger one and finish with glitter glue. Fix the bloom to gift wrap and decorate the parcel

• Roll a strip of patterned orange paper onto the end of a length of florist wire and stick in place. Download the template and cut four small petals from matching paper, curling them between your fingers. Stick around the rolled paper.

• Cut six large petals and curl, then stick randomly around the flower to build up shape. Trim three leaf shapes from green paper and cut out the veins. Curl as before and glue to the wire.
• Coil the remaining wire around a cylindrical object to form a napkin ring. Add glitter glue to the petals for a glistening effect.

Busy lives often involve a lot of memos and reminders, and it can sometimes be hard to keep track. Luckily, we’ve got a sophisticated solution to keep your desk tidy and…

If you’re having a quiet Valentine’s with your beloved at home this year, make the place look a little more special with a speedy-to-make hearts frieze. Papercrafting doesn’t get much easier than…
Home decor Home decorations How to Papercraft Papercrafter Techniques Projects

1. Using a 3.5cm circle die, cut eight discs from chipboard and sixteen circles from patterned paper. Glue the patterned circles to either side of the discs and punch a…

Craft essentials
1. Cut a 5cm x 15cm strip of double-sided patterned paper and fold in half lengthways. Draw parallel pencil lines at 1.5cm and 2cm from the…


