


Issue 64 is packed with amazing paper-crafting ideas plus wonderful creative tools for you to explore a wealth of fab techniques with. We’re including a origami and paper folding this issue by including some gorgeous decorative projects plus some beautiful embellished cards featuring this effective skill. To whet your appetite take a look at Elizabeth Moad’s two bonus paper-fold greetings… And for more help on perfecting your paper folding be sure to buy issue 64 of PaperCrafter!
PaperCrafter Kit, PaperCrafter Studio Selection Paper Book, Blank white card, Glue, Brads
• Mount light blue floral patterned paper to a card blank.Use a home computer to print “Happy Birthday” on to spare patterned paper and mount to the card with foam pads.

• Cut another square and mount to the card. Then cut four 5cm squares from light blue origami paper and four squares 4cm each from the patterned paper.
• Take one square fold the square of paper edge-to-edge with the pattern innermost. Open out and fold the square corner to corner pattern outermost. The square will then form a hat shape.
• Do this for all squares, then interlock alternating between large and small. Add a brad and glue to the card.
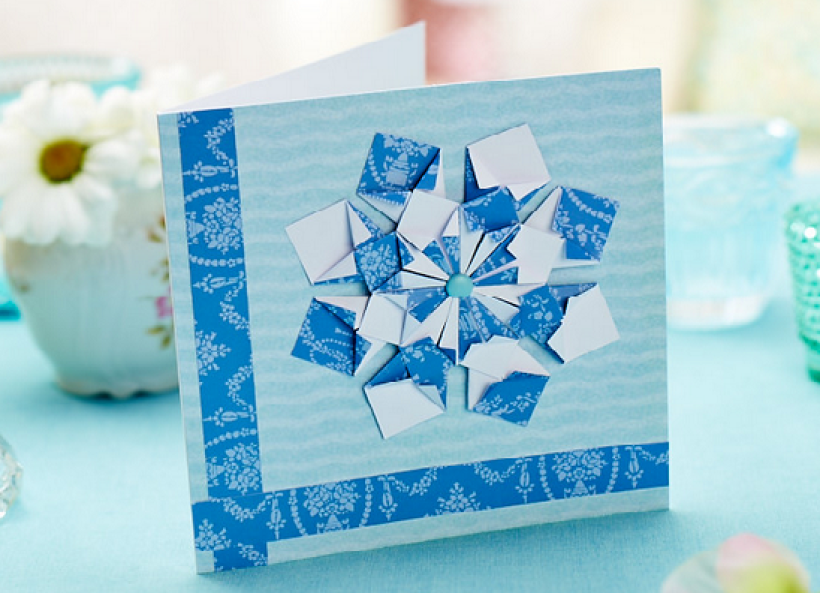
• Take blue patterned paper and cut eight 2.5cm squares and eight 4cm squares. Take one square and fold over corner to corner pattern outermost, lightly crease to give a centre line. Open out and then fold each side to the centre line just made. Then take the top of this section just folded, and fold back over to give a small “collar” type effect. Repeat with another square but fold with the pattern innermost. Do this with all the paper squares.

• Cover a blank white card with light origami blue paper and attach two strips of blue patterned paper vertically and horizontally. Now glue the larger folded pieces to the card to form a circle with points inwards but not touching at the centre.
• Glue the smaller pieces on top of the other, as shown, this time with the points touching at the centre. Add a brad to the centre.

Busy lives often involve a lot of memos and reminders, and it can sometimes be hard to keep track. Luckily, we’ve got a sophisticated solution to keep your desk tidy and…

If you’re having a quiet Valentine’s with your beloved at home this year, make the place look a little more special with a speedy-to-make hearts frieze. Papercrafting doesn’t get much easier than…
Home decor Home decorations How to Papercraft Papercrafter Techniques Projects

1. Using a 3.5cm circle die, cut eight discs from chipboard and sixteen circles from patterned paper. Glue the patterned circles to either side of the discs and punch a…

Craft essentials
1. Cut a 5cm x 15cm strip of double-sided patterned paper and fold in half lengthways. Draw parallel pencil lines at 1.5cm and 2cm from the…


