


Make the most of the shaped blanks that come free with issue 62’s kit by following this card making tutorial by Corinne Bradd. A length of ribbon here, a flat-backed gem there; these small touches turn the cherry and apple blanks into contemporary cards that are perfect for invites or just for saying hello.
PaperCrafter kit, Spare card, Double-sided tape, Craft knife, Scissors, Glue
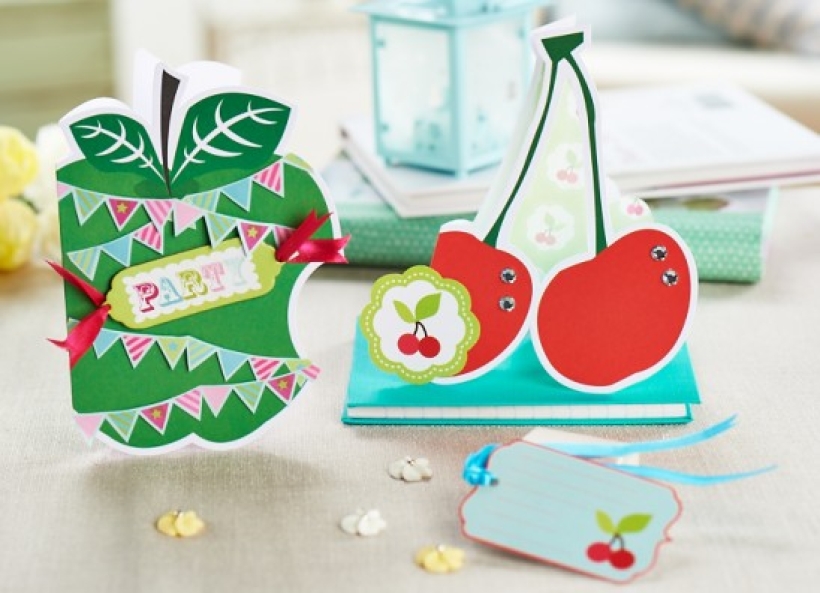
• Using sharp scissors, cut out two rows of bunting from patterned paper. Leave a 1mm blue border around the design to ensure the bunting holds together. Use foam pads to drape the bunting across the apple card at different angles.
• Press out the 'Party' chipboard tag. Cut two 7cm pieces of pink ribbon and thread one through each hole. Fold over and fix with a small foam pad before clipping the ends neatly. Fix the tag to the centre of the card.
• Fold a cherry blank in half and trace around it onto spare card. Create another template for the vellum insert by tracing inside this shape, leaving a 1cm margin all around except at the fold.
• Use a craft knife to cut out the white card between the cherry stalks through both thicknesses of card. Fold the cherry vellum sheet in half and place the template up to the fold. Draw and cut out the insert and fix inside the card with double-sided tape on the top edges.
• Glue two pairs of flat-backed gems to the cherries as shown. Carefully trim the scalloped cherry charm from the kit's backing board and fix to the bottom left with foam pads.

Busy lives often involve a lot of memos and reminders, and it can sometimes be hard to keep track. Luckily, we’ve got a sophisticated solution to keep your desk tidy and…

If you’re having a quiet Valentine’s with your beloved at home this year, make the place look a little more special with a speedy-to-make hearts frieze. Papercrafting doesn’t get much easier than…
Home decor Home decorations How to Papercraft Papercrafter Techniques Projects

1. Using a 3.5cm circle die, cut eight discs from chipboard and sixteen circles from patterned paper. Glue the patterned circles to either side of the discs and punch a…

Craft essentials
1. Cut a 5cm x 15cm strip of double-sided patterned paper and fold in half lengthways. Draw parallel pencil lines at 1.5cm and 2cm from the…


